
Chrome Music Lab Philippines 2026: Complete User Guide & Classroom Manual
Music becomes easier to understand when learners can experiment with sounds, create melodies, and explore rhythms through interactive activities. Chrome Music Lab Philippines 2026 is a helpful resource for students, teachers, parents, and beginners who want to discover music using a web browser. It provides interactive experiments that allow users to create songs, explore musical patterns, investigate sound waves, and connect music with mathematics, science, and visual art.
For learners in the Philippines, Chrome Music Lab offers a convenient way to explore musical concepts without purchasing instruments or installing dedicated music-making software. The platform is free to access, and users do not need to create an account or enter a password to begin. Whether you are a student completing a classroom activity, a teacher preparing a music lesson, or a beginner interested in digital creativity, this complete guide explains how to access Chrome Music Lab, explore its main experiments, create music with Song Maker, and use the platform for educational activities.
What Is Chrome Music Lab?
Chrome Music Lab is an interactive collection of online music experiments developed by Google in collaboration with musicians, artists, and programmers. It introduces different musical and scientific concepts through visual activities that encourage users to experiment rather than simply read explanations.
With Chrome Music Lab, users can arrange musical notes, create rhythmic patterns, draw images that generate sounds, explore chords, and observe visual representations of sound. Each experiment focuses on a particular concept, making it easier to understand how music works through practical experience.
The platform is useful for music education because it combines sound, movement, patterns, and visual feedback. Students can explore how changing a note affects a melody, how different beats create rhythms, and how sound frequencies relate to pitch.
Chrome Music Lab also connects music with other learning areas. For example, students can explore mathematical patterns through rhythms, investigate sound waves during science lessons, or combine digital drawing with musical creativity during art activities.
Who Can Use Chrome Music Lab in the Philippines?
Chrome Music Lab is suitable for learners with different levels of experience. You do not need formal music training or knowledge of musical notation to get started.
The platform can be useful for the following groups:
- Students: Explore melodies, musical notes, rhythms, and sound patterns through interactive experiments.
- Teachers: Demonstrate musical concepts and prepare engaging classroom activities.
- Parents: Encourage children to explore music and creativity at home.
- Beginners: Experiment with digital music without purchasing instruments.
- Artists and musicians: Test musical ideas, explore patterns, and experiment with sound.
- Science learners: Investigate pitch, frequency, vibrations, and the visual properties of sound.
For Philippine schools, Chrome Music Lab can support classroom demonstrations, individual learning activities, group projects, and introductory music lessons. Teachers can also use it to encourage students to create original compositions and share their work with classmates. Visit Homepage.
How to Access Chrome Music Lab Online
Accessing Chrome Music Lab is simple because the experiments run directly in a compatible web browser. You do not need to download a separate application or complete a traditional registration process before exploring the available activities.
Requirements for Using Chrome Music Lab
Before opening Chrome Music Lab, make sure you have the basic requirements listed below.
| Requirement | Details |
|---|---|
| Internet connection | Needed to open the website and load its experiments |
| Web browser | A current version of Chrome, Safari, Microsoft Edge, or Firefox |
| Device | A desktop computer, laptop, tablet, or compatible smartphone |
| Audio output | Built-in speakers, external speakers, or headphones |
| Google account | Not required for basic access |
| Registration | No separate account registration is needed |
| Cost | Free to access |
| Music experience | No previous musical knowledge is necessary |
A laptop or desktop computer may provide a more comfortable experience when arranging notes or working with larger interactive grids. However, compatible touchscreen devices can also be useful for drawing, selecting musical notes, and exploring other experiments.
The website does not replace a complete professional digital audio workstation. Instead, it provides accessible tools for learning, experimentation, and creative exploration.
Step-by-Step Guide to Opening Chrome Music Lab
Accessing Chrome Music Lab is simple and does not require a complicated registration process. Whether you are using a laptop, desktop computer, tablet, or smartphone in the Philippines, you can visit the official website and start exploring its interactive music experiments within a few moments. Follow the steps below to open the platform and begin learning about music through hands-on activities.
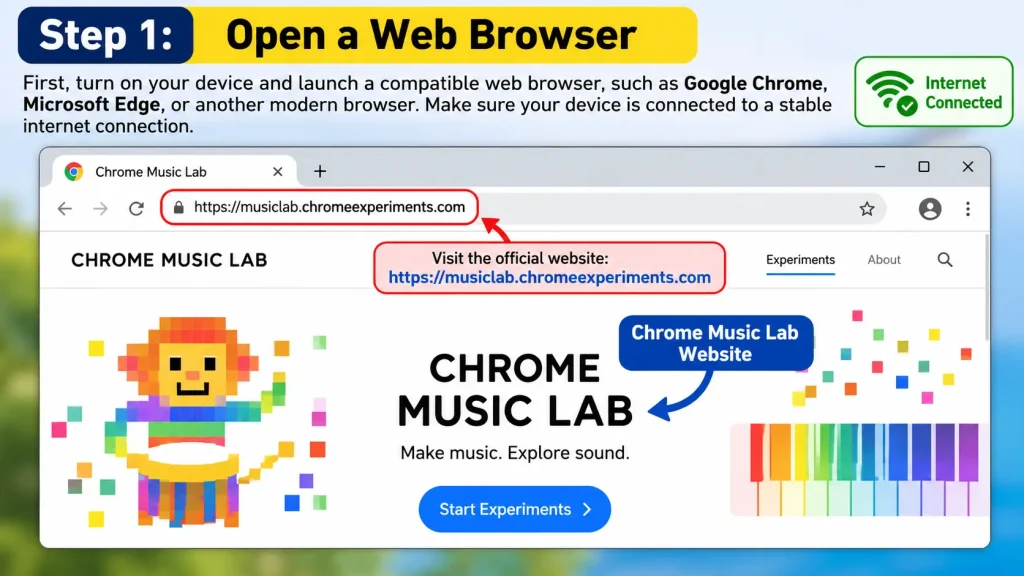
Step 1: Open a Web Browser
First, turn on your device and launch a compatible web browser, such as Google Chrome, Microsoft Edge, or another modern browser. Make sure your laptop, desktop, tablet, or smartphone is connected to a stable internet connection. A properly working browser and internet connection will help the experiments load smoothly and allow you to interact with the available music tools.
Official Website: Chrome Music Lab
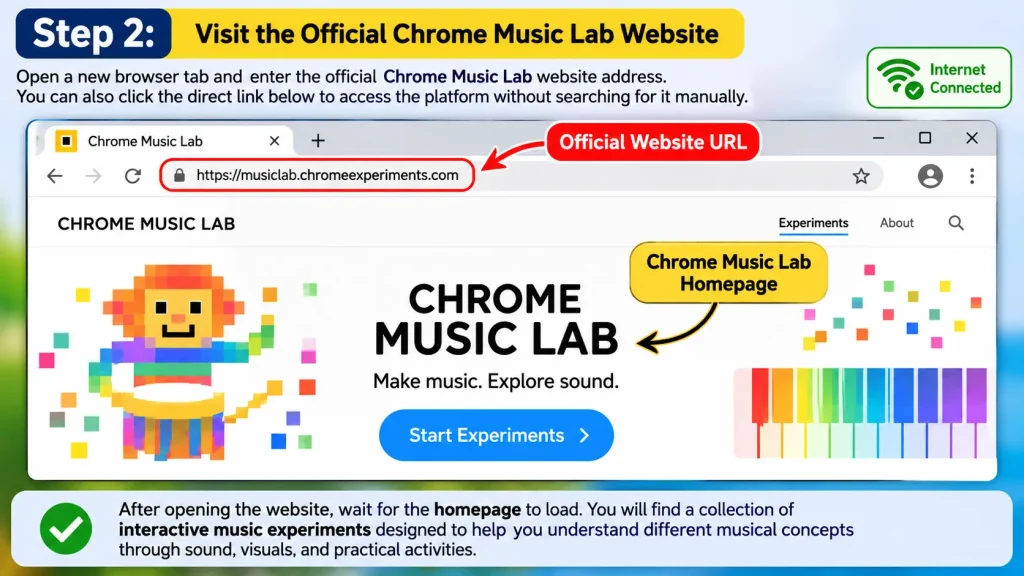
Step 2: Visit the Official Chrome Music Lab Website
Open a new browser tab and enter the official Chrome Music Lab website address. You can also click the direct link below to access the platform without searching for it manually.
After opening the website, wait for the homepage to load. You will find a collection of interactive music experiments designed to help users understand different musical concepts through sound, visuals, and practical activities. Always use the official website to access the original experiments.
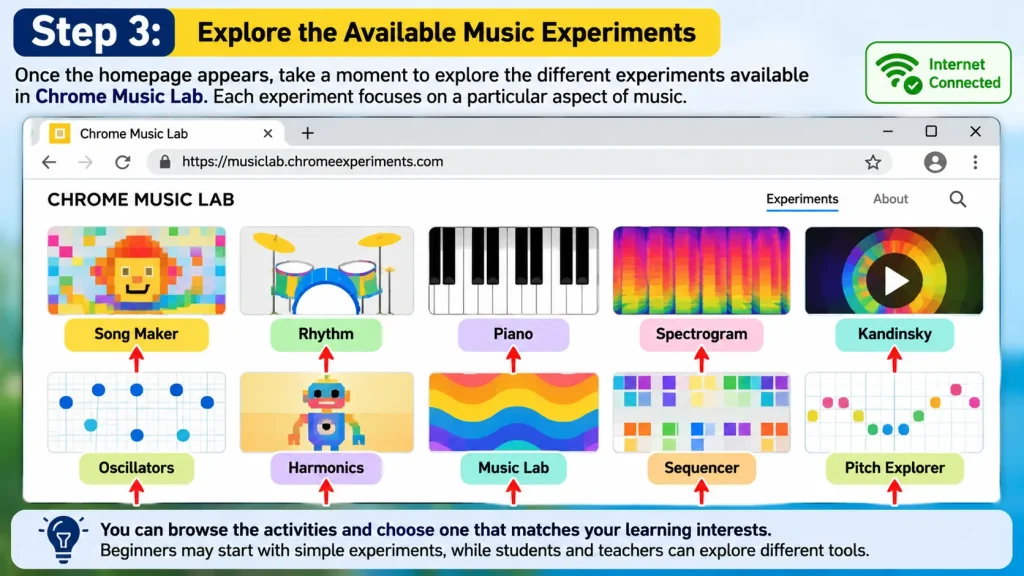
Step 3: Explore the Available Music Experiments
Once the homepage appears, take a moment to explore the different experiments available in Chrome Music Lab. Each experiment focuses on a particular aspect of music, allowing you to discover how melodies, rhythms, sound frequencies, and visual patterns work together. You can browse the activities and choose one that matches your learning interests. Beginners may start with simple experiments, while students and teachers can explore different tools for more detailed classroom activities.
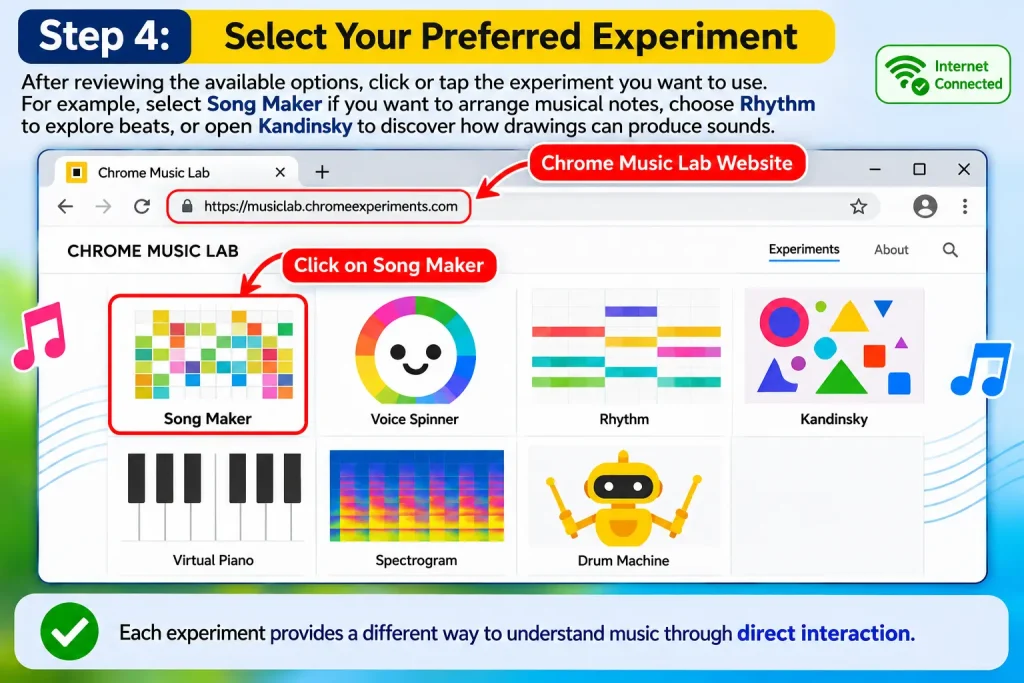
Step 4: Select Your Preferred Experiment
After reviewing the available options, click or tap the experiment you want to use. For example, select Song Maker if you want to arrange musical notes and create your own melody. Choose Rhythm if you want to explore beats and rhythmic patterns, or open Kandinsky to discover how drawings and shapes can produce sounds. Each experiment provides a different way to understand music through direct interaction.
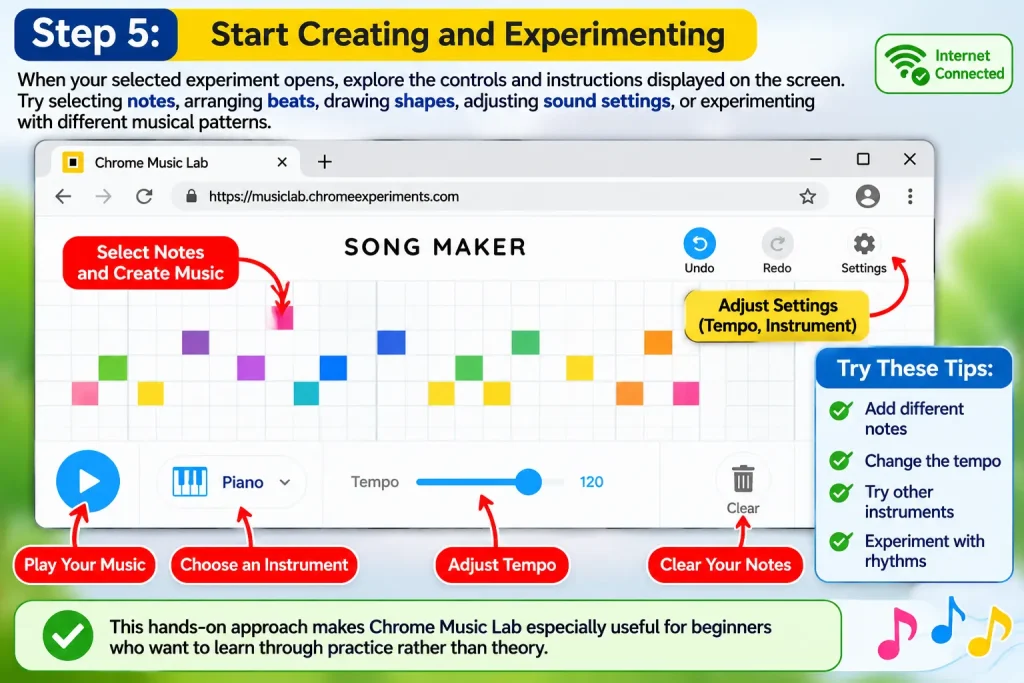
Step 5: Start Creating and Experimenting
When your selected experiment opens, explore the controls and instructions displayed on the screen. Depending on the activity, you may be able to select notes, arrange beats, draw shapes, adjust sound settings, or experiment with different musical patterns. Try changing individual elements and observe how each adjustment affects the sound. This hands-on approach makes Chrome Music Lab especially useful for beginners who want to learn through practice rather than theory alone.
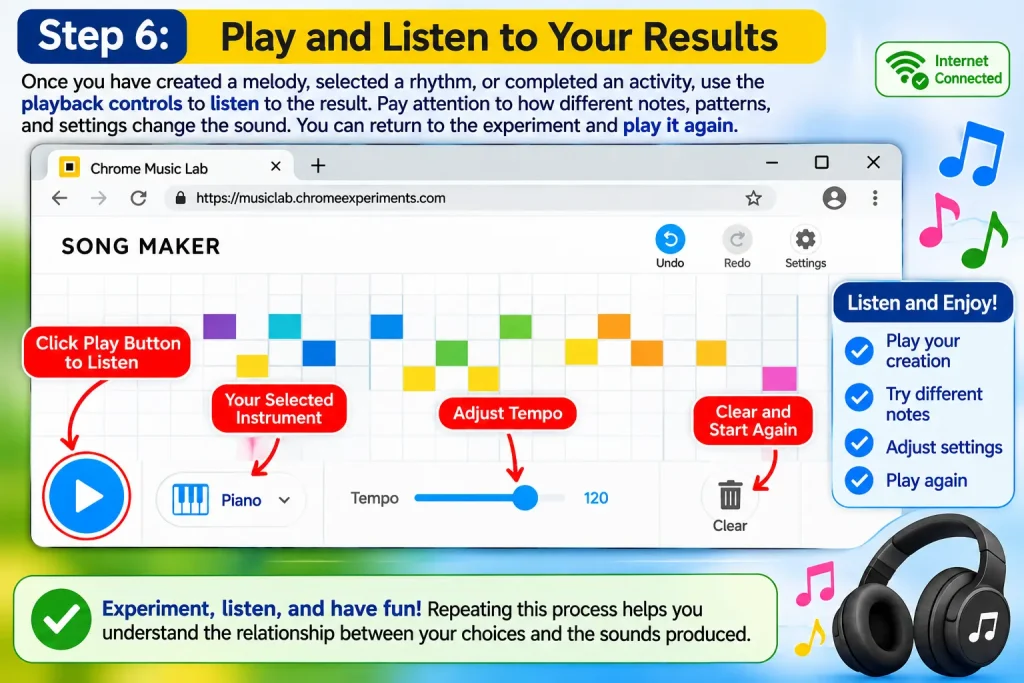
Step 6: Play and Listen to Your Results
Once you have created a melody, selected a rhythm, or completed an activity, use the available playback controls to listen to the result. Pay attention to how different notes, patterns, and settings change the sound. You can return to the experiment, make further adjustments, and play it again until you are satisfied with your creation. Repeating this process helps you understand the relationship between your choices and the sounds produced.
Important Note: Chrome Music Lab is an educational music platform, not a traditional student portal or account-based service. You do not need to register, create a username, sign in, or reset a password to access its basic experiments. Simply visit the official website, select an activity, and start exploring music directly through your browser.
Main Features of Chrome Music Lab
Chrome Music Lab includes several interactive experiments that help users explore different aspects of music and sound. Some activities focus on composition, while others demonstrate how sound behaves or how visual patterns can be transformed into musical experiences.
The following table introduces some of the main experiments available on the platform.
| Experiment | Main Purpose | Example Activity |
|---|---|---|
| Song Maker | Create melodies and rhythmic patterns | Arrange notes to compose a short song |
| Rhythm | Explore beats and rhythmic patterns | Listen to different rhythms and practise clapping |
| Kandinsky | Connect drawing with sound | Draw shapes and hear the resulting sounds |
| Oscillators | Explore pitch and sound vibrations | Compare higher and lower sounds |
| Spectrogram | Visualise the frequencies in sound | Observe the frequency patterns of different sounds |
| Chords | Explore combinations of musical notes | Compare the sound of different chords |
| Arpeggios | Explore notes played in sequence | Listen to musical patterns that move up or down |
Each experiment provides a different way to explore music. You can begin with a simple activity and gradually move towards experiments that introduce more complex musical or scientific concepts.
The exact controls and available options vary by experiment. For the best learning experience, spend time exploring one activity before moving to another.
How to Use Song Maker in Chrome Music Lab
Song Maker is one of the most useful experiments for beginners who want to create music online. It provides a visual grid where users can arrange notes and percussion sounds to produce a musical sequence.
Instead of using traditional sheet music, you select squares on the grid to build a composition. When you press play, the selected notes are played in sequence, allowing you to hear how the different elements work together.
Step 1: Open the Song Maker Experiment
Visit the official Song Maker page using the link above. Wait for the interactive experiment to load in your browser.
You should see a musical grid and playback controls. These tools allow you to create and listen to a composition without downloading additional music software or registering for a separate account.
Step 2: Understand the Song Maker Grid
Before creating your first composition, familiarise yourself with the main parts of the interface.
- Melody grid: Select squares to add notes at different pitches and positions.
- Rhythm section: Arrange percussion sounds to create a beat.
- Playback controls: Start or stop the musical sequence.
- Settings: Explore the available options for adjusting the composition.
- Save or share option: Generate a shareable link when the relevant option is available.
The position of a selected square affects when a note plays. Its location within the grid also determines its pitch. Experimenting with different positions helps you understand the relationship between musical timing and melody.
Step 3: Create Your First Melody
Start with a short and simple musical pattern. You can always add more notes after understanding how the grid works.
- Select a square near the beginning of the melody grid.
- Add several notes in different positions.
- Leave some squares empty to create pauses.
- Press play to listen to your composition.
- Move or remove notes to improve the melody.
Try arranging the notes so the melody gradually rises before returning to lower pitches. Listen carefully to how the movement between notes changes the overall sound.
For beginners, creating a short melody is often more useful than trying to produce a complete song immediately.
Step 4: Add a Rhythm Pattern
After creating a melody, experiment with the percussion section to introduce a beat.
Place percussion sounds at regular intervals and play the composition. Listen to how the rhythm supports the melody and makes the sequence feel more structured.
Next, move some percussion notes to different positions. This allows you to experiment with variations in timing and create different rhythmic patterns.
In a classroom setting, students can clap along with the percussion or reproduce the rhythm using simple instruments. This activity helps develop listening skills, timing, and coordination.
Step 5: Adjust the Available Settings
Explore the settings menu to understand how different composition options affect your music.
Depending on the available controls, you may be able to adjust settings such as the musical scale, sequence length, beats per bar, or tempo.
For example, a pentatonic scale uses five different notes per octave and can be a helpful starting point for creating simple melodies. Experiment with the available options and listen to the results after each change.
Avoid changing every setting at once. Adjusting one option at a time makes it easier to understand its effect on the composition.
Step 6: Play and Review Your Composition
Once you have arranged your notes and percussion, play the entire sequence from beginning to end.
Listen for sections that sound repetitive, unexpected, or incomplete. You can then add notes, remove unnecessary sounds, or change the rhythm to improve your composition.
There is no single correct result when creating music with Song Maker. The purpose of the activity is to experiment, listen, make decisions, and learn from the results.
Step 7: Save and Share Your Music
When your composition is ready, look for the available save or share option. Song Maker can generate a shareable link to a composition, allowing you to revisit or share your work when the feature is available.
Copy the generated link and share it with a teacher, classmate, or family member. If you are completing a school assignment, follow your teacher’s instructions for submitting the link.
Remember that a shareable composition link is different from creating a user account. You do not need a separate Chrome Music Lab account to begin experimenting with music.
Classroom Activity: Create and Share a Short Song
Teachers in the Philippines can use Song Maker to organise a simple music composition activity.
Ask each student to create a short melody using the visual grid. Students can then add a basic percussion pattern and listen to the completed composition.
After finishing, students can share their compositions with a partner and explain how they selected the notes and arranged the rhythm. If classroom instruments are available, learners can also try performing their digital melodies using xylophones, keyboards, or other suitable instruments.
This activity encourages creativity, listening, rhythm practice, and collaboration while introducing students to digital music creation.
By starting with simple patterns and gradually exploring additional features, students can develop a better understanding of how melodies and rhythms work together. Chrome Music Lab makes this process approachable by allowing learners to hear the results of their decisions immediately.
Explore Rhythm with Chrome Music Lab
Rhythm is an important part of music because it determines how sounds are arranged over time. It creates the steady beats and repeating patterns that make music feel energetic, relaxing, or exciting. With the Chrome Music Lab Rhythm experiment, students in the Philippines can explore different beats through interactive visuals and animated percussion.
This experiment is particularly useful for beginners because it introduces musical timing without requiring expensive instruments or advanced music skills. Teachers can use it to demonstrate counting, beat recognition, coordination, and teamwork during classroom activities.
How to Use the Rhythm Experiment
The Rhythm experiment in Chrome Music Lab provides an interactive way to explore beats, percussion patterns, and musical timing. It allows students and beginners to listen to different rhythmic arrangements while observing animated instruments that represent individual sounds. By following the steps below, you can practise keeping a steady beat, recognise different percussion patterns, and understand how separate musical parts work together.
Step 1: Open the Rhythm Experiment
Start by visiting the official Chrome Music Lab Rhythm experiment using the link below:
Official Rhythm Experiment: https://musiclab.chromeexperiments.com/Rhythm/
Allow the experiment to load completely before interacting with it. Once the activity appears on your screen, examine the available controls, animated instruments, and rhythmic options. Take a moment to understand the layout so you can easily follow the sounds and patterns during the activity.
Step 2: Select and Listen to a Rhythmic Pattern
Choose one of the available rhythm options and listen carefully to the pattern it produces. Depending on the selected arrangement, you may hear rhythms organised around three beats, four beats, or other groupings. Try counting along with the music to recognise its timing and identify when the pattern repeats.
For example, a three-beat pattern can be counted as one, two, three, while a four-beat pattern follows one, two, three, four. Repeating these counts while listening can help you understand how beats are organised into rhythmic patterns.
Step 3: Observe the Animated Instruments
As the rhythm plays, pay attention to the animated characters representing different musical and percussion parts. These visual elements provide helpful cues about when individual sounds occur, making it easier to connect what you see with what you hear. Listen for differences between higher and lower percussion sounds, and try to recognise each part separately before focusing on the complete rhythmic arrangement.
Step 4: Practise Keeping a Steady Beat
Start the experiment again and follow the main pulse by clapping your hands, tapping your knees, or marching in time with the music. Focus on maintaining a consistent beat instead of trying to copy every percussion sound at once. Once you become comfortable following the main rhythm, gradually practise reproducing the individual percussion patterns. This exercise can improve your timing, listening skills, and understanding of musical rhythm.
Step 5: Perform the Rhythm as a Group
Teachers can make the Rhythm experiment more engaging by dividing students into small groups and assigning each group a different body-percussion activity. Each group should follow its assigned pattern while listening to the experiment.
For example:
- Group 1: Stamp your feet to represent lower sounds.
- Group 2: Tap your thighs to follow another percussion part.
- Group 3: Clap your hands in time with higher sounds.
Play the rhythm and encourage each group to perform its assigned activity at the correct time. When all groups participate together, students can experience how separate rhythmic parts combine to create a coordinated musical performance. This classroom activity also encourages teamwork, concentration, listening, and an understanding of how different beats work together.
What Can Students Learn from Chrome Music Lab Rhythm?
The Rhythm experiment can support several important learning objectives.
| Learning Area | What Students Can Learn |
|---|---|
| Beat recognition | Identify and maintain a steady musical pulse |
| Musical timing | Follow repeated patterns without rushing |
| Counting | Count beats in different rhythmic groupings |
| Coordination | Match physical movements to musical sounds |
| Listening skills | Recognise differences between percussion parts |
| Teamwork | Perform separate rhythmic patterns together |
Teacher’s tip: Begin with a simple rhythm before introducing more complicated patterns. Students who find it difficult to maintain the beat can listen to the music first and then gradually begin clapping along.
This activity makes Chrome Music Lab a practical resource for introducing rhythm through listening, movement, and group participation.
Create Music from Drawings with Chrome Music Lab Kandinsky
Have you ever wondered what happens when a drawing becomes music? The Chrome Music Lab Kandinsky experiment explores this creative idea by transforming visual marks into sounds.
Inspired by abstract art and the relationship between shapes and musical expression, Kandinsky allows users to draw directly on a digital canvas and listen to the resulting composition. Instead of arranging notes on traditional sheet music, learners experiment with lines, curves, circles, and other visual forms.
For students in the Philippines, this experiment provides an enjoyable way to combine digital art, music, and creative thinking in a single activity.
Step-by-Step Guide to Using Kandinsky
The Kandinsky experiment in Chrome Music Lab allows users to explore the connection between visual art and music. By drawing lines, curves, and shapes on an interactive canvas, you can create visual compositions that are transformed into sounds. This activity is particularly useful for beginners, students, and teachers who want to explore creativity through a combination of drawing and sound.
Step 1: Open the Kandinsky Experiment
First, visit the official Kandinsky experiment using the link below:
Official Kandinsky Experiment: https://musiclab.chromeexperiments.com/Kandinsky/
Wait for the interactive canvas to load completely. Once it appears on your screen, you can begin creating artwork and exploring how your drawings are translated into musical sounds.
Step 2: Draw on the Interactive Canvas
Use your computer mouse, touchscreen, or another compatible input device to draw directly on the canvas. You can create simple lines, curves, circles, and different shapes to begin your experiment. There is no need for professional drawing skills because the main purpose of this activity is to discover how visual marks influence the sounds produced by the experiment.
Step 3: Experiment with Different Drawing Positions
The position of your drawing can influence the pitch of the generated sound. Marks placed higher on the canvas generally produce higher-pitched sounds, while marks positioned lower can produce lower-pitched sounds. To understand this relationship, try drawing similar shapes at different heights and listen carefully to the changes. This simple activity helps demonstrate how visual position can be connected to musical pitch.
Step 4: Explore Different Shapes and Patterns
Experiment with a variety of visual elements, including straight lines, circles, curves, and abstract patterns. Observe how Kandinsky interprets your drawings and how changing their arrangement affects the resulting sounds. Different marks and positions can create different musical results, so try several combinations rather than expecting every shape to produce a specific instrument or sound.
Step 5: Play Your Musical Artwork
After completing your drawing, use the available playback controls to listen to the musical composition generated from your artwork. Watch how the experiment processes your visual arrangement and transforms it into a sequence of sounds. You can return to the canvas, modify your drawing, and play it again to compare the results. Repeating this process allows you to explore the relationship between artistic expression, visual patterns, and sound in an enjoyable and practical way.
Classroom Activity: Create a Musical Weather Scene
Teachers can use Kandinsky to combine music, visual art, and descriptive language in one classroom activity.
Ask students to create a drawing that represents a particular weather condition, such as heavy rain, a thunderstorm, or a sunny afternoon. They can use different shapes, lines, and marks to represent the atmosphere they want to communicate.
After generating the music, ask students whether the sounds match the mood of their drawings.
For example, scattered marks might represent raindrops, while longer strokes could represent wind. Students can compare their compositions and explain how their visual choices influenced their creative results.
Learning benefits include:
- Encouraging creativity and independent experimentation.
- Introducing the relationship between visual position and musical pitch.
- Connecting music with visual art.
- Developing observation and listening skills.
- Exploring musical composition without traditional notation.
Through this activity, Chrome Music Lab helps students discover that music can be created in different ways, including through visual patterns and artistic expression.
Understand Sound Waves with Chrome Music Lab Oscillators
Music is closely connected to the science of sound. Every musical tone involves vibrations, and the characteristics of those vibrations help determine how a sound is heard. The Chrome Music Lab Oscillators experiment gives learners an interactive way to investigate the relationship between oscillation, frequency, and pitch.
An oscillator produces a repeating signal. When the frequency of a signal changes, the number of cycles occurring each second changes as well. For audible tones under comparable listening conditions, a higher frequency generally corresponds to a higher perceived pitch.
This makes Oscillators useful for students who want to explore basic sound concepts during music or science lessons.
How to Explore Oscillators
The Oscillators experiment in Chrome Music Lab introduces users to the relationship between sound, frequency, and pitch. It allows students and beginners to interact with different tones and observe how changing positions or settings affects the sounds they hear. This experiment is a practical way to explore basic sound concepts through listening and hands-on activities.
Step 1: Open the Oscillators Experiment
Visit the official Chrome Music Lab Oscillators page using the link below:
Wait for the interactive experiment to load completely before exploring its controls. Once the activity appears, examine the available elements and read the on-screen instructions to understand how to interact with the experiment.
Step 2: Interact with the Available Controls
Use your computer mouse or move your finger across the touchscreen to interact with the available elements. Follow the instructions displayed on the screen and pay attention to how your movements influence the sounds produced. Try different positions and interactions to discover how the experiment responds to your input.
Step 3: Compare High and Low Sounds
Listen carefully to the different tones generated as you change positions or settings. Notice the difference between higher and lower sounds. Higher frequencies generally produce higher-pitched tones, while lower frequencies usually create deeper sounds. Compare two different tones and try to identify which one sounds higher. Repeating this activity can help develop your listening skills and understanding of pitch.
Step 4: Understand the Relationship Between Sound and Frequency
Frequency describes the number of repeating cycles in a sound wave that occur every second. It is measured in hertz (Hz), a standard unit used to describe sound frequency. Understanding this concept helps explain why some tones sound higher while others sound lower.
For example:
- 200 Hz: A signal at this frequency completes 200 cycles per second.
- 400 Hz: A signal at this frequency completes 400 cycles per second.
When comparing these signals as tones, the 400 Hz signal produces a higher pitch than the 200 Hz signal. This simple comparison helps students understand how frequency relates to pitch and how changes in a sound wave affect what they hear.
Why Is Oscillator Exploration Useful?
The Oscillators experiment makes an abstract scientific concept easier to investigate through direct interaction.
| Concept | Explanation |
|---|---|
| Frequency | The number of repeating cycles per second |
| Pitch | How high or low a sound is perceived |
| Oscillation | Repeated movement or variation |
| Sound signal | A changing signal that can produce an audible tone |
| Waveform | A representation of how a signal changes over time |
Classroom activity: Ask students to listen to two different tones and identify which sounds higher. Then encourage them to explain the difference using the term frequency.
Teachers can also connect this experiment with physics lessons about vibrations, wave behaviour, and sound production.
By combining listening with simple scientific explanations, Chrome Music Lab helps students investigate how sound works rather than relying entirely on textbook descriptions.
Visualise Sound with Chrome Music Lab Spectrogram
The Chrome Music Lab Spectrogram experiment allows users to investigate sound through visual representations. Instead of only listening to a voice or musical tone, learners can observe patterns that show different frequency components within a sound.
A spectrogram typically displays time along the horizontal axis and frequency along the vertical axis. Visual intensity represents the strength of different frequency components. These patterns help learners explore the characteristics of voices, musical notes, and other sounds.
For students and teachers in the Philippines, this experiment can support introductory lessons about sound analysis, vocal characteristics, and the science behind music.
What Can Students Learn from Spectrogram?
The Spectrogram experiment introduces several useful concepts related to sound and music.
- Frequency components: A sound can contain several frequencies rather than a single pure tone.
- Harmonics: Many musical and vocal sounds contain frequency components related to a fundamental frequency.
- Timbre: The characteristics that help listeners distinguish between different sounds, even when they have similar pitches.
- Vocal variation: Different vowels and consonants create different acoustic patterns.
- Sound analysis: Visual representations can reveal characteristics that are difficult to identify through listening alone.
For example, two people can sing the same musical note but still sound different because their voices have different timbral characteristics. A spectrogram can help learners investigate some of the acoustic differences behind these perceptions.
Privacy reminder: Microphone permission is necessary for microphone-based activities. You do not need to grant microphone access to use experiments that do not require it.
This makes Spectrogram a valuable option for introducing students to the connection between music, technology, and basic acoustic science.
Explore Chords and Arpeggios in Chrome Music Lab
After learning about rhythm, melody, and pitch, users can explore chords and arpeggios to develop a broader understanding of musical structure.
A chord consists of multiple musical notes played together. An arpeggio, by comparison, plays the notes of a chord one after another rather than simultaneously.
Both concepts appear in many styles of music, making them useful for beginners who want to understand how individual notes combine to create melodies and harmonies.
Explore Chords: Listen to Notes Played Together
Open the official Chrome Music Lab Chords experiment:
Listen to the available chord combinations and compare their sounds. Notice how changing the combination of notes can change the overall musical character.
Teachers can ask students to describe what they hear in their own words before introducing formal music theory terminology.
For example, students can compare two chord combinations and discuss whether they sound similar or different. The goal is to develop attentive listening and an understanding of how notes work together.
Explore Arpeggios: Listen to Notes in Sequence
Open the official Chrome Music Lab Arpeggios experiment:
Explore the available patterns and listen as notes are played one after another. Pay attention to whether the sequence moves towards higher or lower pitches and how this movement influences the musical effect.
Students can compare the sound of several notes played together with the sound of related notes played individually in sequence.
This activity helps learners recognise that musical notes can be organised in different ways to create different listening experiences.
Chords vs Arpeggios: What Is the Difference?
The following table explains the main differences between these two musical concepts.
| Feature | Chords | Arpeggios |
|---|---|---|
| How notes are played | Multiple notes sound together | Notes sound one after another |
| Main learning focus | Harmony | Note sequences and patterns |
| Listening activity | Compare combined sounds | Follow individual notes |
| Creative application | Explore harmonic colour | Explore melodic movement |
| Beginner activity | Listen to different chord combinations | Identify rising and falling note sequences |
Understanding chords and arpeggios can help students develop their musical vocabulary and become more confident when discussing melody, harmony, and musical structure.
These experiments also encourage learners to listen carefully, identify patterns, and discover how different arrangements of notes influence a musical composition.
For classroom use, teachers can ask students to listen to both experiments and describe the differences they notice. This simple comparison provides an accessible introduction to musical concepts without requiring students to read traditional sheet music.
Benefits of Using Chrome Music Lab Philippines
Chrome Music Lab Philippines 2026 provides several benefits for students, teachers, parents, and beginners who want to explore music through interactive online activities. Its simple interface, free experiments, and visual learning tools make it a useful resource for introducing musical concepts without requiring expensive instruments or professional software.
Here are some of the main benefits of using Chrome Music Lab for education and creative learning.
1. Free Access to Interactive Music Experiments
One of the biggest advantages of Chrome Music Lab is that its experiments are free to access. Users do not need to purchase a subscription, create a separate account, or complete a registration process before getting started.
This makes Chrome Music Lab a convenient option for Filipino students and teachers who want to introduce digital music activities without spending money on specialist software.
2. Easy to Use for Beginners
Chrome Music Lab is designed to make music exploration accessible to people with different experience levels. Its experiments use visual controls that allow learners to select musical notes, create rhythms, draw shapes, and listen to different sounds.
Students do not need to understand traditional musical notation before using the platform. They can learn basic musical concepts through experimentation and gradually develop their understanding.
This beginner-friendly approach makes Chrome Music Lab suitable for introductory music lessons and independent creative activities.
3. Connects Music with Other Subjects
Another important benefit of Chrome Music Lab is its ability to connect music with different areas of education. Teachers can use its experiments to introduce concepts that are also relevant to mathematics, science, art, computer science, and language learning.
| Subject | Example of Using Chrome Music Lab |
|---|---|
| Music | Create melodies, explore chords, and practise rhythmic patterns |
| Mathematics | Investigate counting, repeated patterns, and sequences |
| Science | Explore sound frequencies, vibrations, and wave behaviour |
| Art | Create visual drawings that generate musical sounds |
| Computer Science | Understand how interactive software responds to user actions |
| Language | Describe sounds and explain creative decisions |
These connections allow teachers to develop engaging classroom activities that encourage students to explore relationships between different subjects.
4. Encourages Creativity and Experimentation
Chrome Music Lab gives learners the freedom to experiment with different combinations of notes, rhythms, and visual patterns. Students can try new ideas, listen to the results, make adjustments, and create their own musical arrangements.
Unlike activities that depend on physical instruments, digital experiments allow users to explore different possibilities without worrying about damaging equipment.
This creative environment encourages independent thinking, curiosity, problem-solving, and confidence in making musical decisions.
5. Supports Classroom and Home Learning
Chrome Music Lab can be used in different educational environments. Teachers can demonstrate experiments during classroom lessons, organise small-group activities, or assign creative exercises for individual practice.
Students can also explore compatible experiments at home using an internet-connected device.
For example, learners can create a short composition with Song Maker and share the generated link with their teacher or classmates when the sharing option is available.
This flexibility makes Chrome Music Lab a useful learning resource for classroom demonstrations, homework activities, and independent music exploration.
Limitations of Chrome Music Lab
Although Chrome Music Lab offers several educational advantages, it is important to understand that the platform has some limitations. It is mainly designed for interactive learning and experimentation rather than advanced music production.
Before using Chrome Music Lab in a classroom or at home, consider the following points.
Limited Advanced Music Production Tools: Chrome Music Lab does not provide the complete recording, mixing, editing, and mastering features found in professional digital audio workstations. It is better suited to learning musical concepts and creating simple compositions.
Internet Connection Required: Users need access to the website through a compatible browser. A slow or unstable internet connection may prevent experiments from loading properly or interrupt the learning activity.
Different Device Experiences: The controls may feel different depending on whether you use a laptop, desktop computer, tablet, or smartphone. Some experiments may be easier to operate with a mouse and a larger screen.
Limited Structured Lessons: Chrome Music Lab provides interactive experiments rather than a complete step-by-step music course. Students may need additional explanations from teachers, textbooks, or other educational resources to understand advanced musical theory.
Microphone Permissions: Some experiments that use microphone input require browser permission. School computers may also have restrictions that prevent students from accessing microphone features.
For the best learning experience, use Chrome Music Lab alongside classroom explanations, listening exercises, practical demonstrations, and other educational materials.
Chrome Music Lab Troubleshooting Guide
Sometimes users may experience problems when opening experiments, playing sounds, accessing microphone features, or sharing their musical creations.
Most basic issues can be investigated by checking the internet connection, browser settings, device audio, and experiment permissions.
The following troubleshooting table explains common problems and possible solutions.
| Common Problem | Possible Solution |
|---|---|
| Chrome Music Lab website does not open | Check your internet connection and reload the official website. |
| Experiment takes too long to load | Wait briefly, refresh the page, or try another modern browser. |
| No sound is playing | Check the device volume, speaker connection, and browser audio settings. |
| Microphone is not working | Review browser microphone permissions and confirm that the correct input device is connected. |
| Drawing or clicking is difficult | Try using a computer mouse instead of a touchscreen, or switch to another compatible device. |
| Song Maker composition is missing | Check whether you saved or copied the shareable link for your composition. |
| Shared composition does not open correctly | Confirm that the complete link was copied and that the website is accessible. |
| School computer blocks an experiment | Contact the school’s IT administrator to check network restrictions and browser permissions. |
Additional Tips for Fixing Chrome Music Lab Problems
If the troubleshooting table does not resolve your issue, try the following additional steps.
Refresh the Website: If an experiment stops responding or does not load correctly, refresh the browser page. However, remember that refreshing may affect unsaved work, so save or copy your composition link first when possible.
Check Your Audio Output: If an experiment appears to be working but produces no sound, check whether your computer is connected to the correct speakers or headphones. Also make sure the device volume is not muted.
Review Browser Permissions: Microphone-based experiments may require permission before they can access your device’s microphone. Check the browser settings if the feature does not respond.
Try Another Compatible Device: If a particular control does not work properly, open the same experiment on another device or browser. This can help you identify whether the problem is related to your device, browser, or input method.
Use Official Chrome Music Lab Pages: Always access experiments through the official Chrome Music Lab website. Avoid unfamiliar third-party copies or websites that request unnecessary personal information.
By following these troubleshooting suggestions, students and teachers can resolve many common access and playback issues and continue using Chrome Music Lab for educational and creative activities.
Frequently Asked Questions About Chrome Music Lab
Final Thoughts on Chrome Music Lab
Chrome Music Lab is a useful platform for anyone who wants to explore music in a simple, interactive, and creative way. Whether you are a student learning basic musical concepts, a teacher preparing classroom activities, a parent introducing children to sounds, or a beginner interested in making music, its experiments offer an enjoyable starting point.
With tools such as Song Maker, Rhythm, Kandinsky, Oscillators, Spectrogram, Chords, and Arpeggios, users can explore melodies, beats, sound waves, patterns, and musical relationships through visual activities. You can create your own compositions, experiment with different sounds, and learn how music connects with subjects such as mathematics, science, and art.
Another advantage of Chrome Music Lab is its easy access. You can open the official website in a supported browser without installing separate software or creating an account for basic use. Although it does not replace professional music production software, it provides a practical learning environment for beginners and classroom activities.