
NBI Clearance Online 2026: Registration, Appointment & Application Guide
The NBI Clearance is a required document in the Philippines for employment, travel, visa applications, and many government transactions. This NBI Clearance Online 2026 guide explains how to register online, create an account, book an appointment, complete your application, pay the required fee, and claim your clearance quickly and easily.

What Is an NBI Clearance Online?
An NBI Clearance is an official document issued by the National Bureau of Investigation (NBI) in the Philippines. It confirms whether an individual has any criminal record, pending legal case, or derogatory information recorded anywhere in the country. Unlike a local police clearance, which only checks records within a specific city or municipality, an NBI system performs a nationwide background verification.
Because of its wider scope, this clearance is widely accepted by employers, government agencies, embassies, educational institutions, and private organisations as proof of a person’s legal record. Visit Homepage.
Why Is an NBI Clearance Important?
An NBI Clearance is commonly required for:
Its nationwide verification system makes it one of the most trusted identification and background-check documents in the Philippines.
What It Is and How to Register Successfully
Getting an NBI Register online is an important step for many Filipinos applying for jobs, travelling abroad, processing visas, or completing government requirements. Since the application process is now available online, applicants can register, schedule an appointment, and pay the required fee before visiting an NBI branch for biometrics. Understanding each step beforehand helps you avoid delays and complete your application smoothly.
How to Register for an NBI Clearance online
The NBI Clearance Online Registration system allows applicants to complete most of the application process digitally before visiting an NBI Clearance. By registering online, you can create an account, enter your personal information, choose an appointment schedule, and pay the clearance fee in advance, making the overall process faster and more organized.
Step 1: Visit the Official NBI online Clearance Website
Before creating your NBI Clearance account, visit the official NBI Online Registration website. On the homepage, choose the applicant category that applies to you. Once selected, review the Terms and Conditions, choose your preferred language, and click “I Agree” to continue with the registration process.

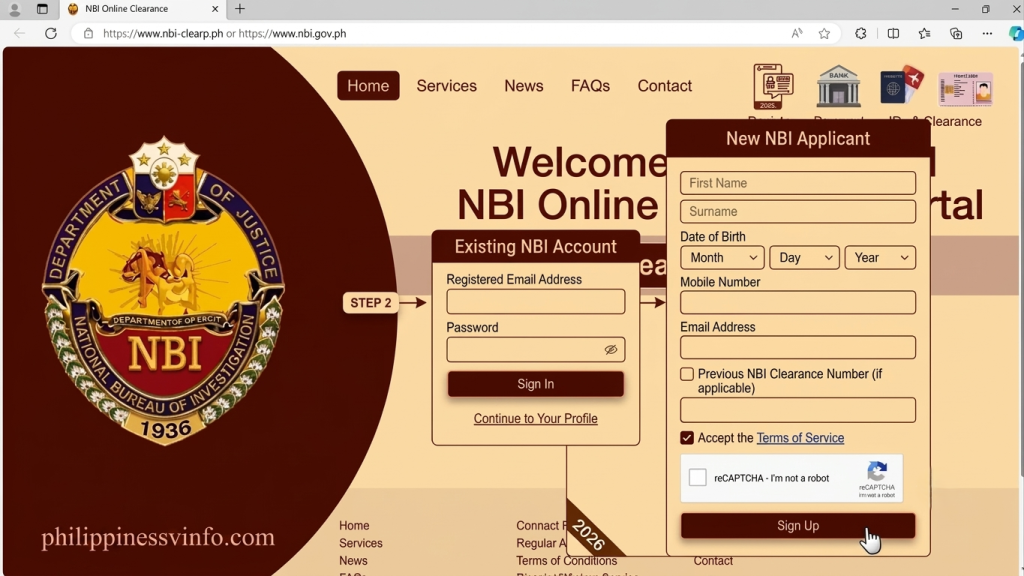
Step 2: Create Your NBI online Account
If you already have an existing NBI account, simply sign in using your registered email address and password, then continue to your profile.
You will be asked to provide information such as:
After completing the form:
- Accept the Terms of Service.
- Complete the CAPTCHA verification.
- Click Sign Up.
For Regular Applicants
Applicants who previously obtained an nbi online registration should indicate whether they already have an old clearance number.
- Select Yes if you previously received an nbi online registration.
- Select No if you are applying for the first time as a regular applicant.
Then continue by entering the requested personal information.
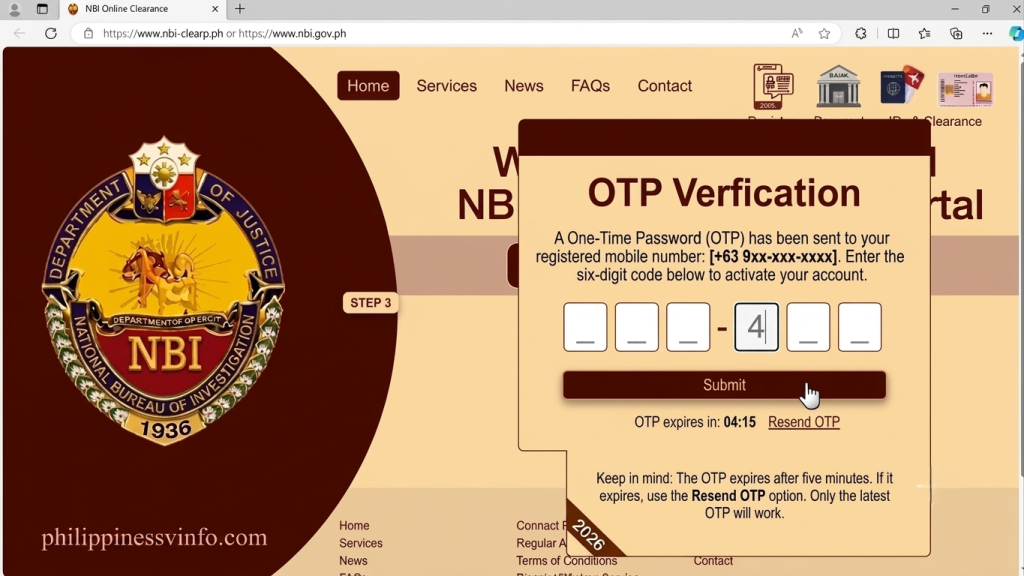
Step 3: Verify Your Account Using the OTP
Once your registration form has been submitted, the system sends a One-Time Password (OTP) to the mobile number you registered. Enter the six-digit verification code into the OTP field to activate your account.
Keep in mind that:
After successful verification, your account will be activated automatically.
Step 4: Complete Your Personal Profile
After verifying your mobile number, log in to your account and finish your personal profile.
The system requires several pieces of personal information, including:

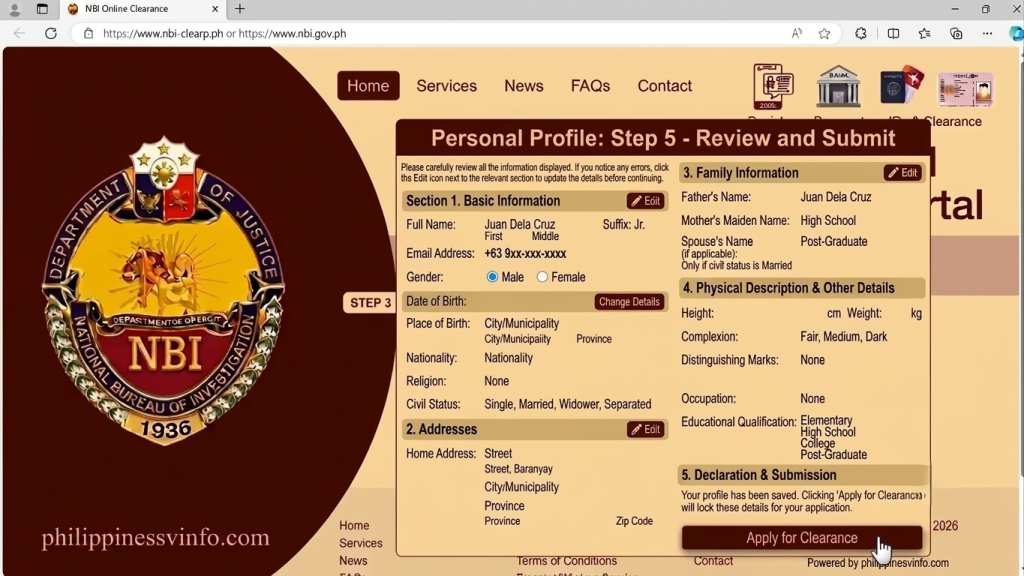
Step 5: Review Your Information and Submit Your Application
After saving your profile, the NBI system will display a summary of the information you entered. This is your opportunity to carefully review every detail before proceeding with your application.
Take a few moments to verify that your name, date of birth, contact details, address, and other personal information are correct. If you notice any mistakes, use the Edit option to update the necessary fields before continuing.
Once you’re satisfied that all the information is accurate, click Apply for Clearance to move to the next stage of the application.
Step 6: Select a Valid Government-Issued ID
After submitting your application, you must choose one valid government-issued identification document from the list provided on the portal. The ID you select online must be the same original ID you present during your appointment at the NBI branch.
Accepted IDs vary, but the portal provides an updated list of eligible identification documents for applicants.

Step 7: Schedule Your NBI Appointment
Every applicant must book an appointment before visiting anNBI Clearance office. Walk-in applications are generally not accepted, so scheduling your visit online is an essential part of the process.
During appointment booking, you will need to:
The system will only display time slots that are still available for your selected date.
Choosing the Right NBI Branch
When selecting a branch, consider:
Selecting a nearby branch can make your visit more convenient, especially if you need to return because of a HIT status or additional verification.
Step 8: Pay the NBI Clearance Fee
After confirming your appointment, the next step is paying the required application fee. Your appointment will only be processed once payment has been successfully completed.
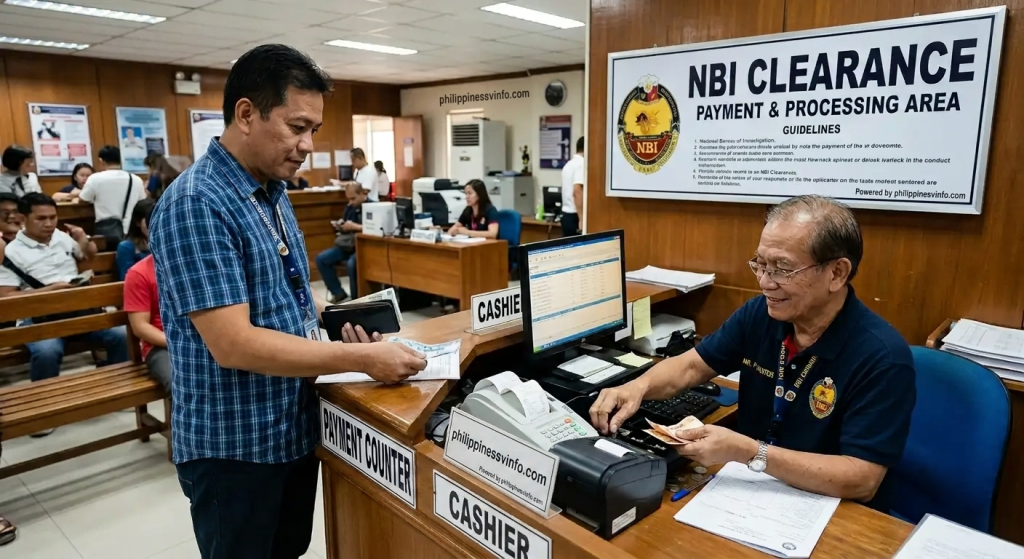
Available Payment Methods
The NBI Clearance portal supports several convenient payment options, including:
Choose the payment method that is most convenient for you and follow the on-screen instructions.
Keep Your Reference Number Safe
After selecting your preferred payment option, the system will generate a unique Reference Number.
This number serves as proof of your transaction and is required to verify your payment. Save or print it until your application has been completed successfully.
How to Save or Print Your NBI Clearance Application
Before your appointment, it is recommended to save or print a copy of your NBI Clearance application for future reference. Keeping a copy helps you quickly access your appointment details, reference number, and application information whenever needed.
How to Apply for nbi online appointment
Applying for an nbi online appointment is now easier than ever, thanks to the NBI Clearance Online application system. Whether you’re applying for a new clearance or renewing an existing one, you can complete most of the process online before visiting your chosen this branch for biometric capture and identity verification. While applicants without internet access may still visit an portal field office for assistance, the online portal remains the fastest and most convenient option.
Step 1: Access the Official NBI online Website
Visit the official NBI Clearance Online website and begin your application. If you’re applying as a First-Time Job Seeker, select the dedicated registration option. All other applicants should proceed with the regular registration process.
When asked whether you have an old NBI online issued from 2014 onwards, select the appropriate answer. If this is your first clearance, choose “No” and continue.
Step 2: Create Your NBI online Clearance Account
Complete the online registration form by entering your personal details, including your full name, birth date, email address, and mobile number. Carefully review the information before submitting.
Step 3: Verify Your Account Using OTP
To secure your account, the NBI Clearance Online sends a One-Time Password (OTP) to your registered mobile number.
Enter the six-digit verification code before it expires. Once verified, your account will be activated automatically, and you’ll be redirected to complete your application profile.
Step 4: Complete Your Personal Information
After logging in, provide all the required personal information, such as:
Click Save Information after completing the form.
Before proceeding, review every detail carefully. If you notice any errors, use the Edit Information option to make corrections. Once everything is accurate, click Apply for Clearance.
Step 5: Select Your Valid Identification
The next step is choosing a valid government-issued ID that you’ll present during your appointment.
Commonly accepted IDs include:
Bring the original copy of your selected ID when visiting the NBI Clearance center.
Step 6: Book Your NBI online Appointment
After selecting your ID, schedule your appointment online.
Choose:
Dates highlighted as available on the appointment calendar can be selected. After confirming your preferred schedule, your appointment details will appear for final review.
Step 7: Pay the NBI online Clearance Fee
Your appointment becomes valid only after payment has been completed.
The NBI Clearance Online supports several payment options, including:
After selecting your preferred payment method, click Proceed. The system will generate a unique payment reference number that you should save until your application has been completed.
NBI Clearance Fee
The standard NBI Clearance fee is ₱130, with an additional ₱25 service charge for most electronic payment channels, such as GCash, Visa, Mastercard, and 7-Eleven.
Step 8: Visit the NBI Clearance Online on Your Appointment Date
Arrive at your selected NBI Clearance branch on the scheduled date and time.
Bring the following:
At the branch, NBI personnel will verify your identity and complete the remaining procedures, including:
After processing, you can check the status of your clearance through your online NBI Clearance Online account.
Step 9: Applying at an NBI Branch
Applicants who cannot complete the online process may also apply directly at an NBI Clearance center or satellite office.
The manual application process generally includes:
- Visit your nearest NBI office.
- Request an NBI online application form.
- Complete the form with accurate information.
- Present valid identification documents.
- Pay the required processing fee.
- Proceed to biometric capture and photograph.
- Wait for your application to be processed and receive your reference or tracking details.
NBI Online Clearance Application
Applying for an NBI online Clearance is the fastest and most convenient way to obtain your clearance certificate. The online system allows you to register, complete your profile, book an appointment, pay the required fee, and monitor your application before visiting your selected NBI branch. Whether you’re a first-time applicant or renewing an existing clearance, following the correct process will help you avoid delays and complete your application successfully.
Step 1: Visit the Official NBI online Website
Begin by opening the official NBI Clearance center portal using your preferred web browser. Before accessing the application page, you’ll be asked to review the website’s Terms and Conditions. Read the information carefully, choose your preferred language if available, and click “I Agree” to continue.
Next, select the applicant category that applies to you:
- First-Time Job Seeker
- Regular Applicant
Before proceeding, ensure you have all the required documents and meet the eligibility requirements for an NBI online application.
Step 2: Register or Log In to Your Account
The registration process depends on whether you’ve previously been issued an NBI Clearance.
Applicants with an NBI portal Issued from 2014 Onwards
If you already have anNBI Clearance center issued from 2014 to the present, select “Yes” when asked if you have an existing clearance. Since your information already exists in the system, you only need to provide:
After verification, you can continue without creating a new account.
First-Time Applicants
If this is your first NBI application, select “No” and complete the online registration form by providing:
Once you’ve entered all the required information, submit the registration form to continue.
Step 3: Verify Your Mobile Number Using OTP
After submitting your registration, the system will send a six-digit One-Time Password (OTP) to your registered mobile number. Enter the verification code within five minutes to activate your account. If the code expires, request a new OTP before proceeding. Once your account has been verified successfully, you’ll be redirected to your applicant dashboard.
Step 4: Complete Your Applicant Profile
The next step is filling out your personal profile. Provide complete and accurate information, including your contact details, address, family information, and other required personal data.
Step 5: Review Your Details and Apply for Clearance
After saving your profile, the system will display a summary of the information you’ve entered.
Carefully review every detail before submitting your application. If you find any errors, click Edit Information to update your profile.
Once you’re confident that all information is correct, select Apply for Clearance to proceed to the next stage.
Step 6: Choose a Valid Government-Issued ID
You’ll now be asked to select the identification document you’ll present during your appointment.
Accepted government-issued IDs include:
After selecting your preferred ID, click I Agree to continue.
Step 7: Book Your NBI Appointment
The appointment booking page allows you to select where and when you’ll visit an NBI Clearance center.
During this step:
Available schedules are highlighted on the calendar. Once you confirm your selection, the appointment slot will be reserved and your schedule will appear on the confirmation panel.
Step 8: Pay the NBI online Processing Fee
After booking your appointment, complete the required payment.
The standard processing fee is:
- ₱130 Clearance Fee
- ₱25 Service Fee
Total: ₱155
Applicants may pay through several convenient payment channels, including:
After selecting your preferred payment option, click Proceed. The portal will generate a payment reference number that you’ll need to complete your transaction.
Once payment has been confirmed:
- Return to your NBI dashboard.
- Open the Transactions section.
- Print or save your application form containing the barcode and reference number.
Step 9: Attend Your Scheduled Appointment
Visit your selected NBI branch on your confirmed appointment date and arrive on time.
Documents to Bring
Bring the following documents with you:
What Happens at the NBI Office?
Upon arrival:
- Present your application documents at the help desk.
- Staff will verify your appointment and identity.
- Proceed to biometric registration.
- Your fingerprints, digital signature, and photograph will be captured.
- Your information will undergo final verification before clearance processing.
Dress Code Reminder
To avoid inconvenience, wear neat and appropriate clothing when visiting the NBI office.
Avoid wearing:
- Tank tops
- Sleeveless shirts
- Shorts
- Slippers
Smart casual or semi-formal attire is generally recommended.
Step 10: Receive Your Online NBI Portal
After completing all verification procedures, the release of your clearance depends on your application status.
If Your Record Has No HIT
Applicants with No HIT (no criminal record or name match requiring further verification) usually receive their NBI Clearance on the same day after processing.
If Your Record Has a HIT
If your application receives a HIT, additional background verification may be required. In most cases, you’ll be instructed to return after 8 to 10 working days once the verification process has been completed.
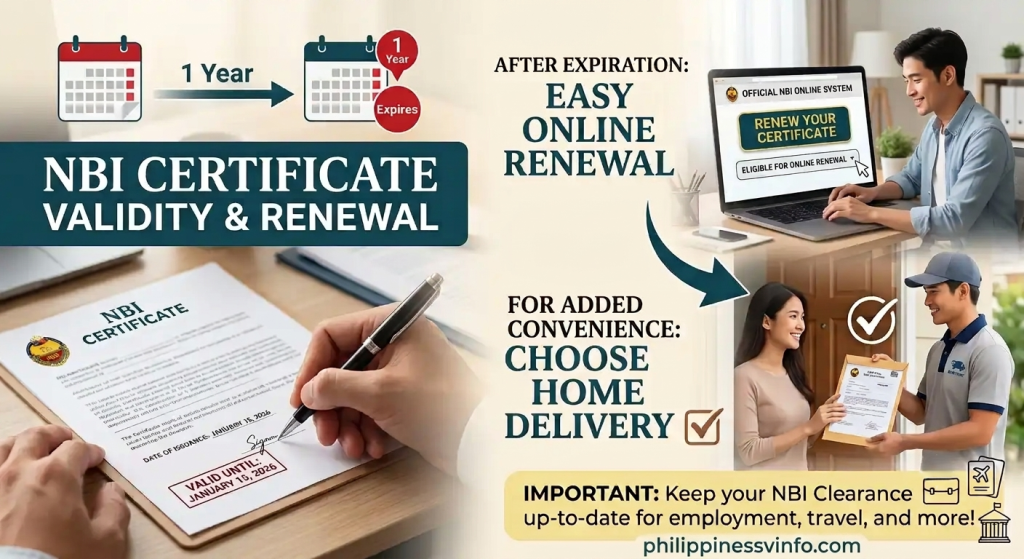
NBI online Clearance Validity
An NBI certificate is generally valid for one (1) year from the date it is issued. Once it expires, you’ll need to renew your clearance if it’s required for future employment, travel, or government transactions.
This certificate is valid for one year from the date of issuance and must be renewed once it expires if needed for employment, travel, or other legal purposes.
NBI online Clearance Requirements in the Philippines
Before applying or renewing your NBI onlineClearance, make sure you have the required documents ready. The specific requirements may vary depending on your applicant category.
Requirements for First-Time Job Seekers
Qualified first-time job seekers may be exempt from paying the NBI Clearance online processing fee.
To claim this benefit, you must present a Barangay Certificate that confirms:
- You are a first-time job seeker.
- You have been a resident of the barangay for at least six months.
- The certificate bears the official dry seal of the barangay.
- It includes the signature of the authorised barangay official.
Applicants must also meet the eligibility requirements under the applicable government guidelines.
Accepted Primary Valid IDs
Every applicant must present at least one original government-issued ID during the NBI Clearance application or renewal process.
Commonly accepted IDs include:
Ensure your identification document is original, valid, and matches the personal information provided in your online application.
Alternative Supporting Documents
If you do not possess a primary government-issued ID, you may still qualify by presenting two valid secondary identification documents, together with supporting records such as:
- PSA Birth Certificate
- Barangay Clearance
- Other documents accepted by the NBI Clearance center for identity verification
Requirements may vary depending on your circumstances, so it’s advisable to prepare all supporting documents before your scheduled appointment.
Common Mistakes to Avoid During Your Application
Many applications are delayed because of simple errors that can easily be prevented.
Avoid the following mistakes:
Preparing your documents carefully and reviewing your application before submission can help ensure a faster and smoother NBI Clearance process.
Key Features of the NBI Online System
The NBI Online System is designed to make the application and renewal process faster, safer, and more convenient for applicants across the Philippines. Instead of spending hours at NBI Clearance center, you can complete most of the requirements online before your scheduled appointment.
Fast and Efficient Processing
The online portal significantly reduces waiting time by allowing applicants to complete registration, appointment booking, and payment before visiting an NBI Clearance center. This helps speed up the overall clearance process.
24/7 Online Access
The NBI website is available around the clock, allowing you to register, update your information, book an appointment, or renew your clearance whenever it’s convenient for you.
Secure Online Transactions
The portal uses secure systems to protect your personal information and payment details throughout the application process, giving applicants greater confidence when submitting their data online.
Nationwide Appointment Booking
Applicants can schedule an appointment at any participating NBI branch or satellite office across the Philippines, making the service accessible regardless of their location.
Convenient and Contactless Application
Most of the application steps—including registration, profile completion, appointment scheduling, and payment—can be completed online. This minimises paperwork and reduces unnecessary visits to NBI offices.
NBI Online Clearance Validity and Renewal Process
An NBI Online Clearance is generally valid for one (1) year from the date of issuance. After it expires, it is no longer accepted for official purposes such as employment, visa applications, government transactions, business registration, and other legal requirements. To avoid delays, it is recommended to renew your clearance before or immediately after its expiration date.
If your previous clearance was processed through the NBI online system, the renewal process is usually faster than submitting a brand-new application. Eligible applicants can renew online, pay the required fee electronically, and, where available, choose home delivery to receive their renewed clearance without visiting NBI Clearance center.
Who Is Eligible for NBI Online Clearance Renewal?
Applicants with a previously issued NBI Online Clearance may qualify for the online renewal service. Your eligibility depends on your existing clearance record and the current requirements of the NBI online system.
Generally, eligible applicants can:
Select home delivery (if available) or follow the collection instructions provided by the system.
Major NBI Registration Centers in the Philippines
Applicants can process their scheduled appointments at variousNBI Clearance center and satellite branches nationwide. Most branches operate Monday to Friday, from 8:00 AM to 5:00 PM, excluding public holidays.
Some of the major NBI Clearance center include:
Applicants should attend the branch selected during online appointment booking and arrive on time with all required documents to avoid delays in processing.
Frequently Asked Questions (FAQs)
Conclusion
Obtaining an NBI online Clearance is an essential step for many personal, professional, and legal transactions in the Philippines. Whether you’re applying for a job, processing a visa, starting a business, enrolling in school, or completing government requirements, having a valid NBI online system helps verify your identity and confirms your record through a nationwide background check.
This system has made the application process faster and more convenient by allowing applicants to register, schedule appointments, pay fees, and renew eligible clearances online. By preparing the required documents, providing accurate information, and following each step carefully, you can complete your application with minimal delays.
If your clearance expires, remember to renew it promptly to ensure it’s ready whenever you need it for employment, travel, or official transactions. Staying informed about the latest NBI policies, requirements, and procedures will also help you avoid common application issues and make the entire process smoother.