
Cisco Packet Tracer Philippines 2026: Complete User Guide
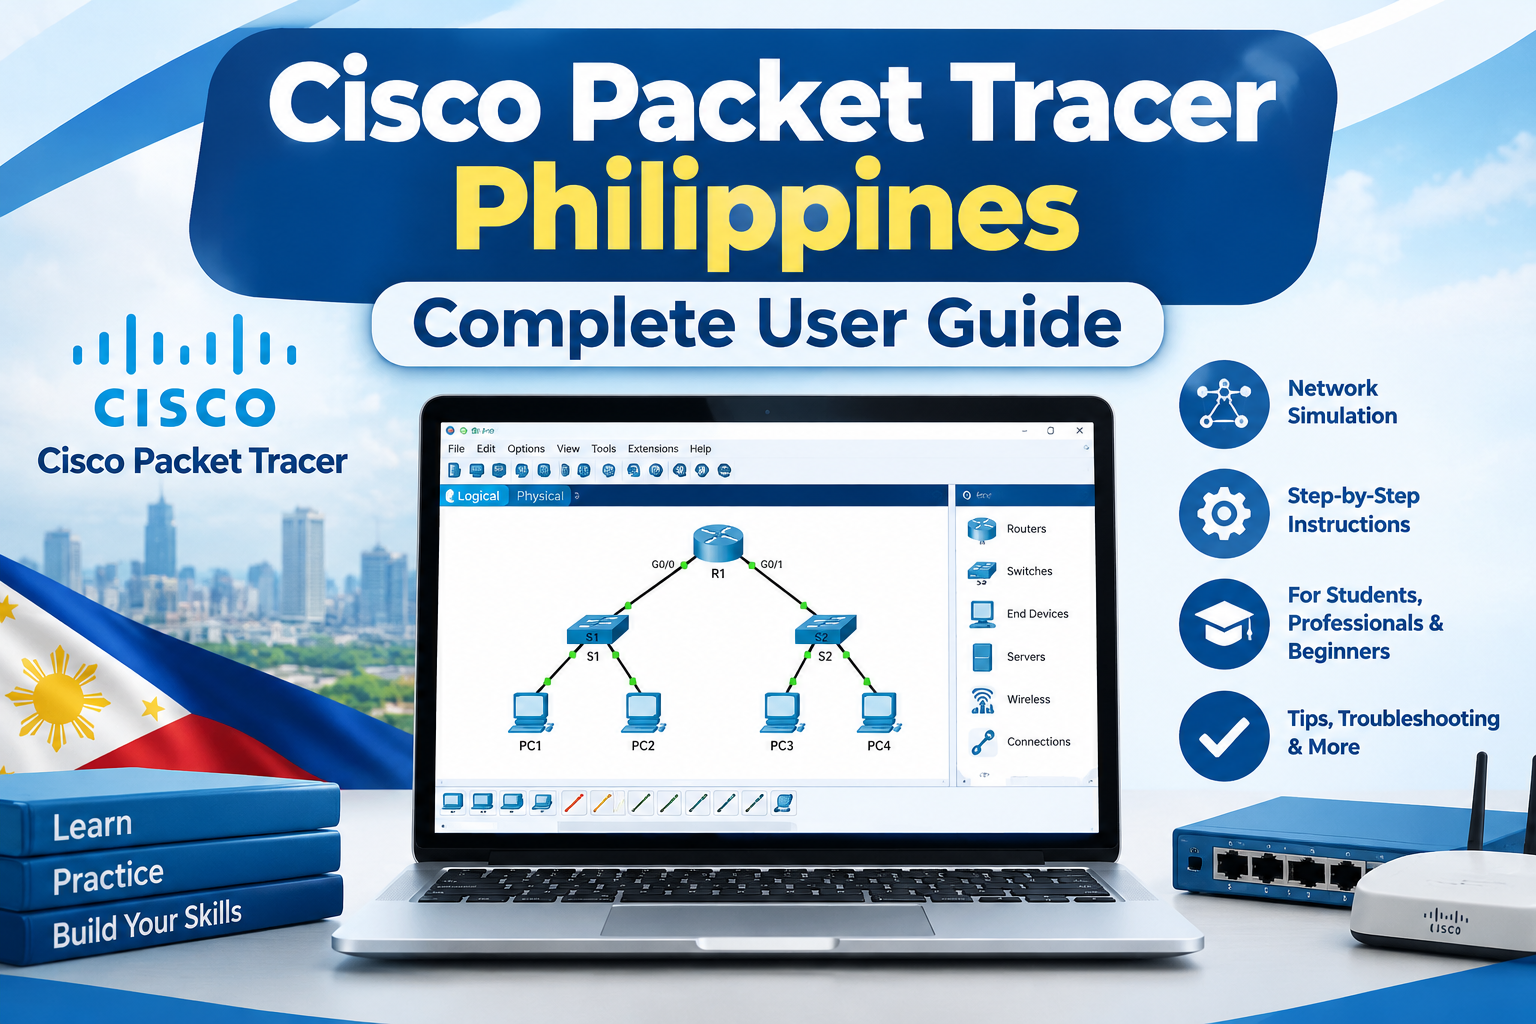
Cisco Packet Tracer is a network simulation programme developed by Cisco that helps students, beginners and aspiring network engineers learn how computer networks work without purchasing physical routers, switches or other networking equipment. It provides a virtual environment where users can design network topologies, configure devices, assign IP addresses and test connections between computers.
For students in the Philippines preparing for networking courses, CCST or CCNA studies, Cisco Packet Tracer offers a practical way to develop essential networking skills. Users can experiment with different network configurations, troubleshoot connection problems and observe how network protocols operate in a simulated environment.
This complete guide explains how to access Cisco Packet Tracer, register for an account, download and install the software, sign in for the first time and begin practising basic networking tasks. It also covers network configuration, practical exercises and common troubleshooting solutions to help beginners build confidence before progressing to more advanced networking labs.
What Is Cisco Packet Tracer and How Does It Work?
Cisco Packet Tracer is a network simulation and visualisation tool available through Cisco’s learning platforms. Rather than requiring physical networking equipment, the software allows users to place virtual devices in a workspace and configure them to create simulated computer networks.
For instance, you can connect two computers to a switch, assign an IP address to each computer and test whether they can communicate successfully. You can also create more advanced network environments featuring routers, servers, wireless access points and Internet of Things (IoT) devices.
Cisco Packet Tracer provides two main working modes:
- Realtime Mode: Devices operate within the simulation as you configure the network, making it easier to test connections and check whether devices communicate correctly.
- Simulation Mode: Users can examine packets as they travel through a network and observe how protocols such as ARP, ICMP, DHCP and DNS support network communication.
One of the main advantages of Cisco Packet Tracer is the ability to practise repeatedly without the cost or risks associated with physical hardware. You can modify device settings, test different configurations, identify mistakes and correct them within the same virtual workspace.
This makes the programme a valuable learning resource for networking students, IT trainees and anyone who wants to understand fundamental networking concepts before working with real equipment.
Key Features That Make Cisco Packet Tracer Useful
Cisco Packet Tracer combines device configuration with visual feedback, helping learners understand networking concepts through practical activities. By connecting virtual devices and observing their behaviour, beginners can explore how networks function without purchasing physical equipment.
| Feature | Benefits for Learners |
|---|---|
| Network Topology Design | Create network layouts by placing virtual devices and connecting them to build functional networks. |
| Router and Switch Configuration | Learn how to configure routers and switches and practise essential networking commands. |
| IP Addressing | Configure IPv4 addresses and subnet masks for computers and other network devices. |
| Packet Simulation | Monitor how data packets travel through a network and identify potential communication issues. |
| Wireless Networking | Practise setting up simulated wireless networks, access points, and connected devices. |
| IoT Activities | Explore connected sensors, smart devices, and basic Internet of Things (IoT) automation. |
| Hands-On Lab Activities | Complete practical networking exercises and save projects for future learning and practice. |
| Network Troubleshooting | Detect and resolve common networking issues, including incorrect IP settings, cable problems, and configuration errors. |
These features make Cisco Packet Tracer a useful learning environment for introductory networking and certification preparation. However, it is a simulator, not a complete replacement for physical networking equipment. Real-world devices, production environments and certain advanced networking functions may behave differently from their simulated equivalents. Visit Homepage.
Cisco Packet Tracer System Requirements
Before downloading Cisco Packet Tracer, check your computer’s operating system, memory, processor and available storage. Requirements can vary between software releases, so consult Cisco’s official download information to confirm compatibility with your device.
The following specifications are general planning guidelines for this guide, not a guarantee that every listed operating system is supported by the latest release.
| Component | Requirements for Planning |
|---|---|
| Windows | Windows 10 or Windows 11, 64-bit |
| macOS | macOS 12 Monterey or newer |
| Linux | Ubuntu 20.04 LTS or newer, 64-bit |
| Processor | Approximately 1.4 GHz Intel or AMD processor |
| RAM | 4 GB |
| Free storage | 1.5 GB |
Note: These specifications should be verified against the requirements for the particular version you download. Older operating systems may not be compatible with newer releases, and more demanding labs may benefit from additional memory and storage.
What Should You Prepare Before Installation?
Preparing your computer and account before installation can help prevent common setup problems. Check the following items before downloading the programme:
- Compatible computer: Make sure your operating system meets the requirements of the available Packet Tracer release.
- Administrator permissions: Confirm that you can install applications on your computer.
- Stable internet connection: You will need internet access to download the installer and complete any required account verification.
- Cisco account: Make sure you can access the email address associated with your account.
- Available storage: Keep sufficient free disk space for the application and your saved networking projects.
- Official download source: Use Cisco’s official learning platform instead of unfamiliar third-party download websites.
For the safest installation process, visit the official Cisco Networking Academy website and follow its current instructions for accessing Cisco Packet Tracer. Using the official source helps you avoid unofficial installers and potentially modified software.
How to Download Cisco Packet Tracer from the Official Website
The recommended starting point for downloading Cisco Packet Tracer is Cisco’s official Networking Academy website. It provides information about the software, learning resources and instructions for accessing the available download.
Official resources:
The available registration options, course requirements and download links may change as Cisco updates its platform. Follow the instructions currently displayed on the official website.
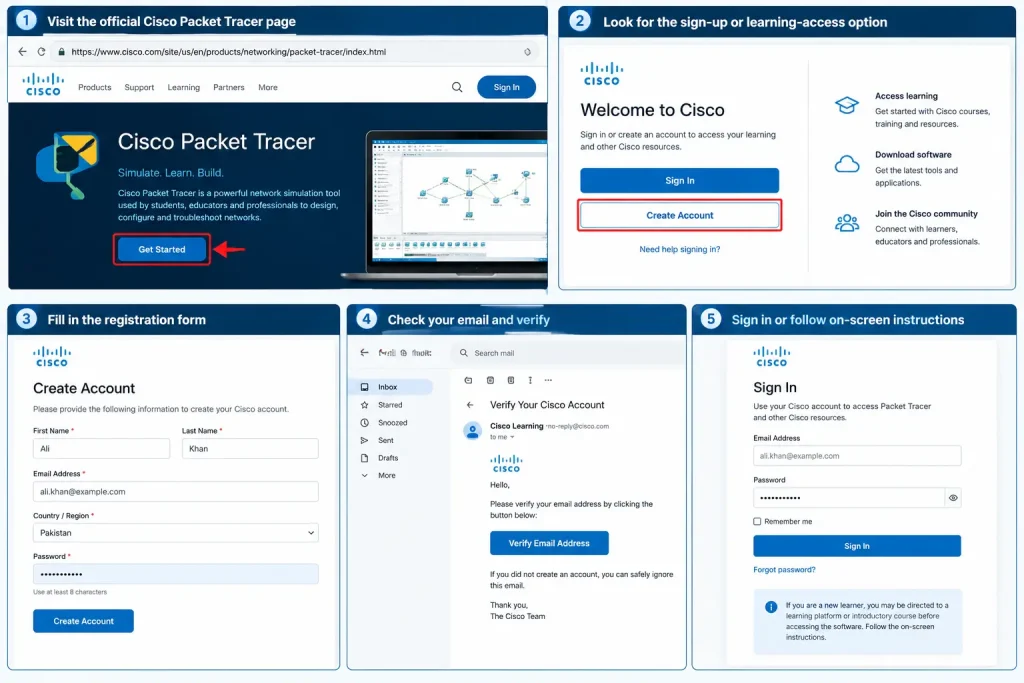
Step 1: Create or Access Your Cisco Learning Account
- Visit the official Cisco Packet Tracer page.
- Look for the available sign-up, enrolment or learning-access option.
- If required, create an account by providing your name, email address, country or region and other requested information.
- Check your email inbox and follow the verification instructions if email confirmation is required.
- If you already have an eligible Cisco learning account, try signing in rather than creating a duplicate account.
Cisco may direct new learners to a related learning platform or introductory course before providing access to the software. Follow the current on-screen instructions instead of relying on older tutorials that may show a different website layout.
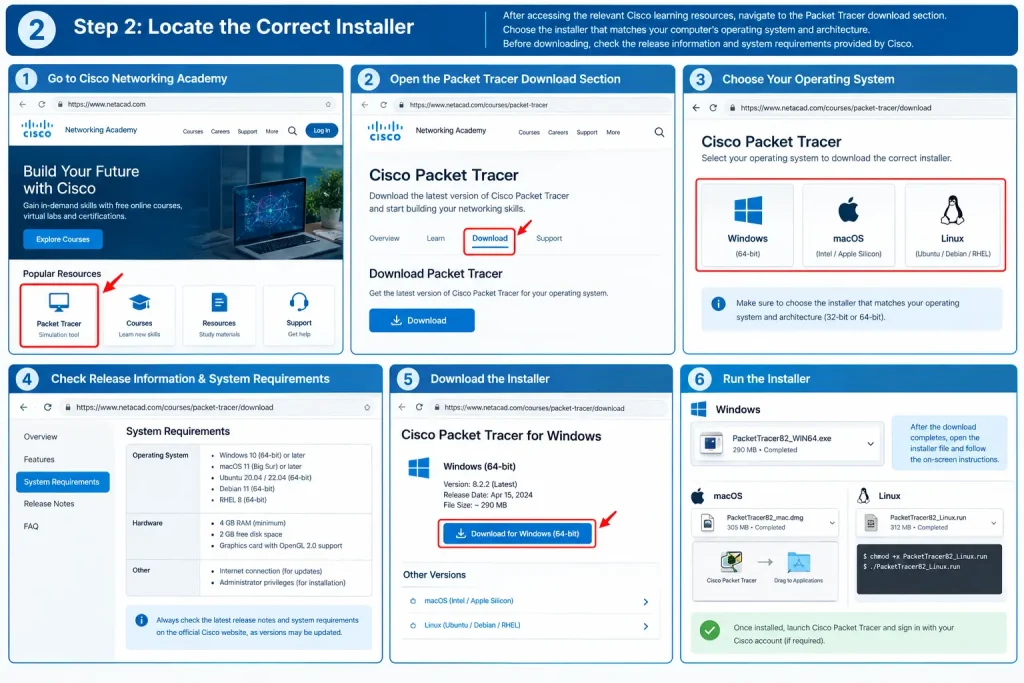
Step 2: Locate the Correct Installer
After accessing the relevant Cisco learning resources, navigate to the Packet Tracer download section. Choose the installer that matches your computer’s operating system and architecture.
For example, Windows users should select the appropriate Windows installer, while Linux users should choose a compatible package for their distribution. macOS users should select a version supported by their installed operating system.
Before downloading, check the release information and system requirements provided by Cisco. Do not assume that a version mentioned in an older tutorial is still the latest release.
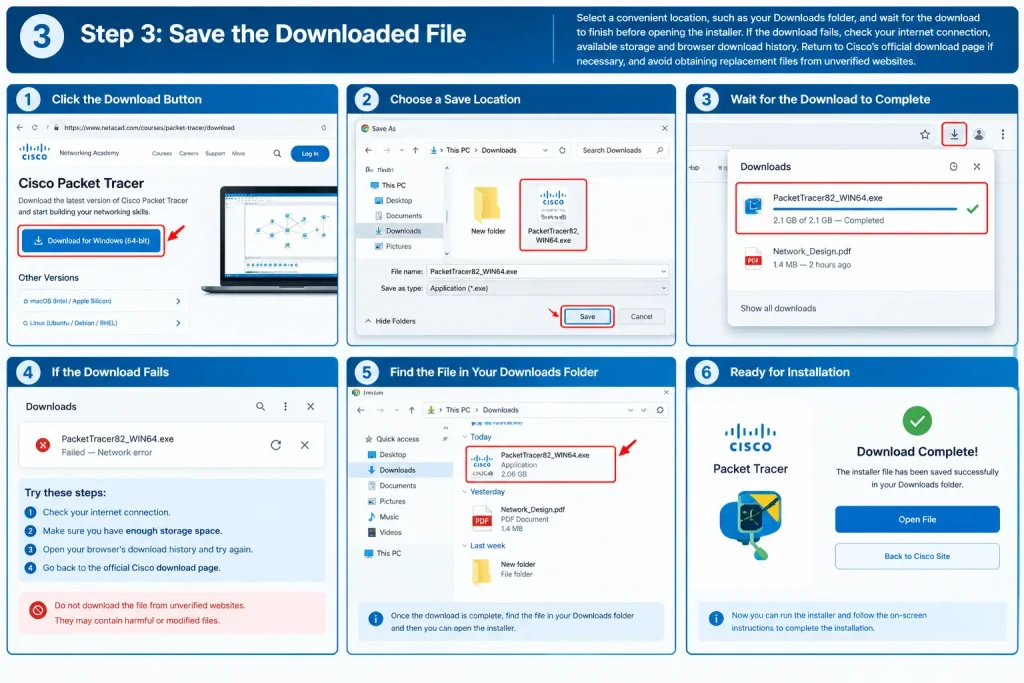
Step 3: Save the Downloaded File
Select a convenient location, such as your Downloads folder, and wait for the download to finish before opening the installer.
If the download fails, check your internet connection, available storage and browser download history. Return to Cisco’s official download page if necessary, and avoid obtaining replacement files from unverified websites.
Installing Cisco Packet Tracer on Windows, macOS and Linux
After downloading the installer, follow the instructions for your operating system. Installation procedures may vary by software release, so consult Cisco’s official Packet Tracer resources if you encounter unfamiliar prompts or compatibility issues.
Windows Installation
Follow these steps to install Cisco Packet Tracer on a compatible Windows computer:
- Open the folder containing your downloaded installation file.
- Double-click the Packet Tracer installer to begin the setup process.
- Read the licence agreement, accept the terms if you agree and click Next.
- Choose the destination folder or keep the default installation location.
- Review the available shortcut and installation preferences.
- Click Install and wait for the process to finish.
- Click Finish if prompted.
- Launch Cisco Packet Tracer from the Start menu or desktop shortcut, if available.
If Windows displays a security warning, verify that the installer came from Cisco’s official source before proceeding.
macOS Installation
To install Cisco Packet Tracer on a compatible Mac, follow these steps:
- Download the macOS installer provided through Cisco’s official learning resources.
- Locate the downloaded file and open it.
- Follow the on-screen installation instructions.
- Accept the licence terms if required and complete the setup.
- Open Cisco Packet Tracer from your Applications folder or the location specified during installation.
If macOS reports a compatibility or security issue, check the requirements for your downloaded release and follow the relevant instructions provided by Cisco.
Linux Installation on Ubuntu
Ubuntu users with a compatible system can install Packet Tracer using the .deb package supplied through Cisco’s official resources.
- Download the appropriate Ubuntu package.
- Open a terminal and navigate to the folder containing the downloaded file.
- Run the following command, replacing the example filename with the exact name of your downloaded package:
- Enter your system password when requested.
- Follow any installation prompts, including licence acceptance where required.
- Once installation is complete, launch Cisco Packet Tracer from your applications menu or terminal.
Installation tip: Do not copy the placeholder filename literally. Use the actual package filename, including its extension. If the command fails, verify the file location, package name and compatibility with your Ubuntu version.
First-Time Login and Account Authentication
Installing Cisco Packet Tracer is only part of the setup process. Depending on the release and account configuration, you may need to authenticate through Cisco’s learning platform before using the application.
Follow these steps to complete the initial sign-in:
- Open Cisco Packet Tracer on your computer.
- Select the login or authentication option displayed on the welcome screen.
- If prompted, follow the instructions to open the relevant Cisco sign-in page.
- Enter the credentials associated with your eligible Cisco learning account.
- Complete any additional verification steps requested on the screen.
- Return to Packet Tracer and check whether the main workspace opens successfully.
If you cannot sign in, confirm that you are using the correct account and that your access to the relevant learning platform is active. Check your internet connection and follow any error messages displayed by the application.
For additional assistance, visit the official Cisco Packet Tracer page and consult the available support resources.
Once the application opens successfully, you can begin creating virtual networks, connecting devices and practising fundamental networking concepts.
Understanding the Cisco Packet Tracer Workspace
After signing in, the next step is to become familiar with the Cisco Packet Tracer interface. The workspace is where you design network topologies, select virtual devices, connect cables and configure how your simulated network operates.
Although the interface may vary slightly between software versions, its main components generally serve the same purposes.
Main Interface Components
| Interface Area | Purpose |
|---|---|
| Menu bar | Access file operations, editing tools, settings and help options. |
| Main toolbar | Use common tools to select, move, delete or annotate objects. |
| Logical workspace | Arrange devices and create a visual representation of your network. |
| Physical workspace | Explore a physical-style representation of networking equipment and locations. |
| Device-type panel | Choose categories such as routers, switches, end devices and wireless equipment. |
| Device selection panel | Select a specific device model from the chosen category. |
| Connections panel | Choose cables and other supported connection types for linking devices. |
| Realtime and Simulation controls | Switch between normal simulated operation and packet-level inspection. |
The Logical workspace is usually the best place for beginners to start. It provides a clear overview of the network without requiring you to arrange equipment inside a simulated building or rack.
How to Add Devices to the Workspace
Follow these steps to place devices on the canvas:
- Open the device-type panel.
- Select the category containing the device you need.
- Choose a model from the available device list.
- Click the desired position in the workspace, or drag the device onto the canvas if supported by your interface.
- Repeat the process for any additional devices.
- Arrange the devices so that their connections remain easy to follow.
For your first exercise, select two generic PCs. Once you understand how to place and connect them, you can extend the topology by adding switches, routers and servers.
Build Your First Network in Cisco Packet Tracer
A two-computer network is an excellent introductory exercise because it teaches three essential networking concepts: device connections, IP addressing and connectivity testing.
The objective is to configure two computers on the same IPv4 subnet and verify that they can communicate successfully.
Network Plan
Use the following configuration for the two computers:
| Setting | PC0 | PC1 |
|---|---|---|
| IPv4 address | 192.168.1.10 | 192.168.1.11 |
| Subnet mask | 255.255.255.0 | 255.255.255.0 |
| Default gateway | Leave blank | Leave blank |
Both computers belong to the same local IPv4 subnet. Because this introductory exercise uses a direct connection between the PCs, you do not need a router or default gateway.
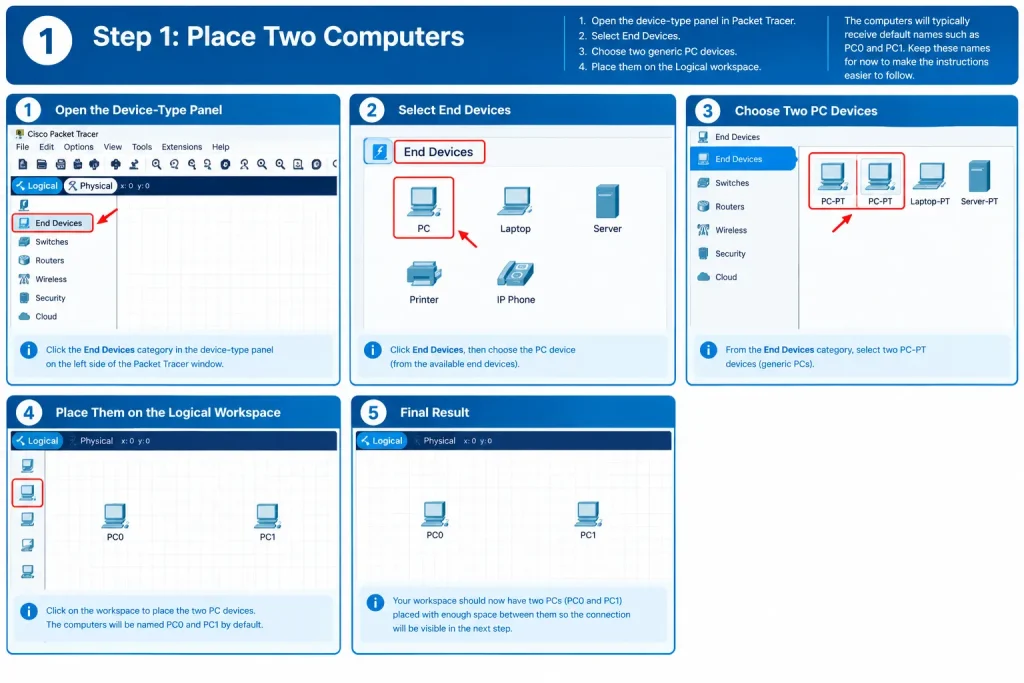
Step 1: Place Two Computers
- Open the device-type panel in Packet Tracer.
- Select End Devices.
- Choose two generic PC devices.
- Place them on the Logical workspace.
The computers will typically receive default names such as PC0 and PC1. Keep these names for now to make the instructions easier to follow.
Position the computers with enough space between them to make their connection visible.
Step 2: Connect the Computers
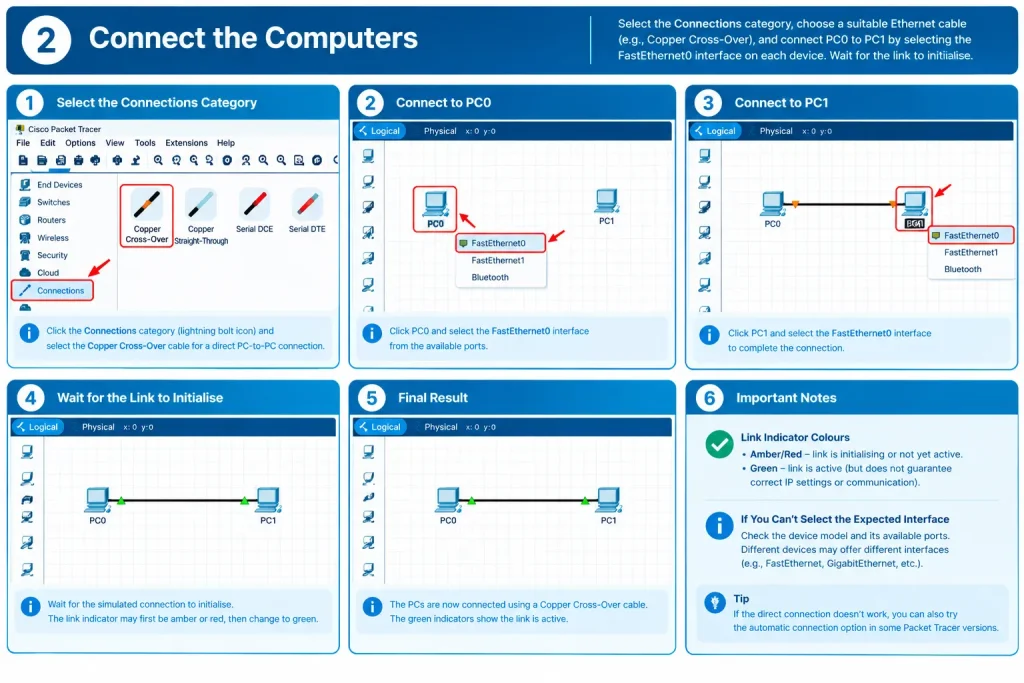
Select the Connections category, commonly represented by a lightning-bolt icon. Choose a suitable Ethernet connection.
For a direct PC-to-PC connection, a Copper Cross-Over cable is a traditional option. Depending on the simulated interfaces and the version of Packet Tracer you are using, the automatic connection option may also work.
Follow these steps:
- Select the appropriate cable.
- Click
PC0and select itsFastEthernet0interface. - Click
PC1and select itsFastEthernet0interface. - Wait for the simulated connection to initialise.
The link indicators may initially appear amber or red before changing. A green indicator generally indicates an active link, but it does not guarantee that the IP settings are correct or that communication will succeed.
If you cannot select the expected Ethernet interface, check the device model and its available ports. Different devices may offer different interfaces.
Step 3: Configure the IPv4 Address on PC0
Each computer needs an appropriate IP address to communicate over an IPv4 network.
To configure the first computer:
- Click
PC0in the workspace. - Open the Desktop tab.
- Select IP Configuration.
- Choose static IPv4 configuration if it is not already selected.
- Enter the following values.
| Setting | PC0 Value |
|---|---|
| IPv4 address | 192.168.1.10 |
| Subnet mask | 255.255.255.0 |
| Default gateway | Leave blank |
Close the configuration window after entering the settings.
The subnet mask 255.255.255.0 identifies 192.168.1.0/24 as the local network. This allows PC0 to recognise PC1’s address as belonging to the same IPv4 subnet.
Step 4: Configure the IPv4 Address on PC1
Repeat the configuration process for the second computer, using a different IP address.
- Click
PC1. - Open Desktop, then select IP Configuration.
- Choose static IPv4 configuration.
- Enter the following values.
| Setting | PC1 Value |
|---|---|
| IPv4 address | 192.168.1.11 |
| Subnet mask | 255.255.255.0 |
| Default gateway | Leave blank |
Close the window when you have finished.
Both computers must have unique IPv4 addresses. Assigning the same address to both devices creates an IP address conflict and can prevent reliable communication.
You do not need to configure DNS for this exercise because you will test connectivity using an IP address directly rather than a domain name.
Step 5: Test Connectivity Between the Computers
After configuring both computers, verify that they can communicate using the ping command.
- Click
PC0. - Open the Desktop tab.
- Select Command Prompt.
- Enter the following command:
- Press Enter and examine the results.
If the configuration is correct, PC0 should receive replies from PC1. The first ping attempt may occasionally time out while address resolution takes place, so repeat the command if necessary.
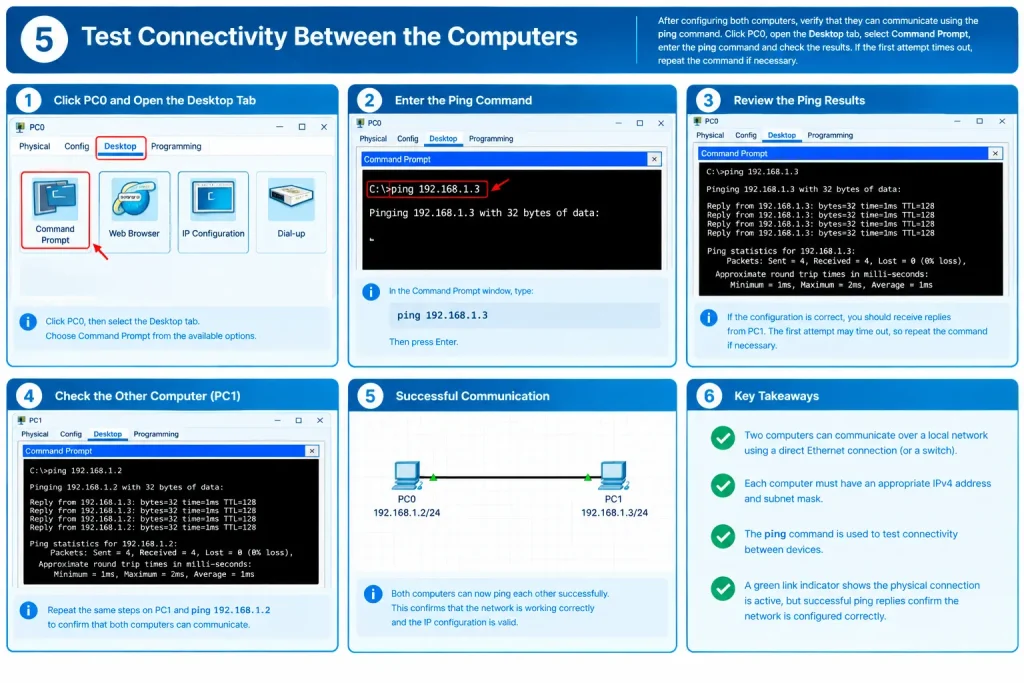
Successful replies indicate that the two computers can communicate over the simulated network.
If the ping fails, check that the cable is connected to the correct interfaces, both IPv4 addresses are correct, the subnet masks match and the simulated link is active.
Understanding Realtime and Simulation Modes
Cisco Packet Tracer provides two modes for observing network behaviour.
- Realtime Mode: Use this mode to configure devices, test connectivity and observe the network as the simulation runs.
- Simulation Mode: Use this mode to inspect individual packets, examine protocol activity and investigate communication problems.
In Simulation Mode, you can use the available event controls to advance packet activity and inspect relevant protocol details. This is particularly useful when learning how ARP resolves local addresses or how ICMP supports ping testing.
For beginners, a useful approach is to build and configure the network in Realtime Mode first, then switch to Simulation Mode to investigate how the communication works.
Practical Networking Exercises for Beginners
Once your two-PC network works, try extending your skills with these activities:
| Exercise | Learning Objective |
|---|---|
| Add a third PC | Practise assigning unique IP addresses within one subnet. |
| Connect PCs through a switch | Learn how a switch connects devices on a local network. |
| Change an IP address | Observe how incorrect addressing affects connectivity. |
| Inspect a ping in Simulation Mode | Examine ICMP packets and related ARP activity. |
| Configure a small network with a router | Explore communication between different IP subnets. |
| Save your project | Learn to preserve and reopen your Packet Tracer lab files. |
Start with simple topologies and confirm that each one works before adding more devices. This approach makes it easier to identify mistakes and understand the effect of individual configuration changes.
Tips for Learning Cisco Packet Tracer Effectively
- Save your project regularly using a descriptive filename.
- Keep a record of IP addresses and subnet masks used in each lab.
- Check device interfaces before connecting cables.
- Use ping tests to verify connectivity after configuration changes.
- Switch to Simulation Mode when you need to understand packet behaviour.
- Experiment with one configuration change at a time so you can identify its effect.
With regular practice, these activities will help you develop a solid foundation in network design, IPv4 addressing and troubleshooting before moving on to more advanced networking labs.
Realtime Mode vs Simulation Mode in Cisco Packet Tracer
One of the most useful features of Cisco Packet Tracer is the ability to observe network behaviour from two different perspectives. Realtime Mode helps you build and test networks under normal simulation conditions, while Simulation Mode allows you to examine individual network events and follow packets as they move between devices.
Realtime Mode
Use Realtime Mode when creating network topologies, configuring device settings and checking whether connections work. Network events progress according to the simulator’s normal timing, allowing you to observe the overall behaviour of your network.
This mode is particularly useful for testing IP configurations, checking connectivity with the ping command and confirming that devices communicate as expected.
Simulation Mode
Simulation Mode provides a closer look at the events taking place inside a network. You can follow packets through the topology, examine the event list and use step controls to understand how different protocols interact.
This mode is especially helpful when learning about ARP, ICMP, DHCP and other networking protocols. Instead of seeing only whether a connection succeeds, you can investigate the sequence of events that makes communication possible.
How to Explore Packets in Simulation Mode
After confirming that your two-PC network works, follow these steps to examine the traffic generated by a test packet.
- Switch from Realtime Mode to Simulation Mode using the mode controls.
- Open the event filters, if necessary, and select relevant protocols such as ARP and ICMP.
- Select the Add Simple PDU tool, commonly represented by an envelope icon.
- Click
PC0to identify the source device, then clickPC1to identify the destination. - Use Capture/Forward to advance through network events one step at a time, or select Auto Capture/Play if available.
- Review the event list and select individual events to inspect the packet information.
During the exercise, you may see ARP requests and replies before the ICMP exchange completes. ARP helps an IPv4 device discover the link-layer address associated with another device on the local network.
ICMP is the protocol used by the ping test. Examining both protocols helps explain why a computer may need to resolve a destination’s Ethernet address before sending the actual test packet.
For additional practice, explore Cisco’s Packet Tracer learning resources and the available activities for inspecting PDUs and network events.
Learning tip: Return to Realtime Mode after completing the experiment and allow the simulation to settle before running additional tests.
Practical Cisco Packet Tracer Labs for Beginners
Once you understand the two-PC exercise, you can expand your skills through progressively more challenging networking activities. Cisco Networking Academy provides learning resources and introductory courses that help students develop practical networking knowledge using simulated environments.
1. Home or Small Office Network
Create a small local area network by adding a switch and connecting several computers.
Assign an appropriate IPv4 address and subnet mask to each PC, then use ping tests to verify connectivity. Observe how the switch allows connected devices to communicate within the same local network.
This exercise introduces basic network topology design, Ethernet connections and IP addressing.
2. Router Configuration
Create two separate IPv4 networks and connect them through a router.
Practise assigning IP addresses to router interfaces, enabling the interfaces where required and checking the routing table. Configure suitable addresses and gateways on the end devices, then test communication between the two networks.
A router is needed to forward traffic between different IPv4 subnets when no other suitable routing device is present.
3. Wireless Networking
Build a basic wireless network using a supported wireless router, laptop or other compatible device.
Explore wireless network names, security settings and IP configuration. Connect the wireless client to the simulated network and test whether it can communicate with other devices.
This activity introduces wireless connectivity and the relationship between wireless access and IP networking.
4. Internet of Things (IoT)
Experiment with supported smart-home devices, sensors and automated appliances in Packet Tracer.
Depending on the available devices and activity, you can configure connected equipment, monitor its simulated state and explore basic automation scenarios.
IoT activities are useful for understanding how networking concepts apply to connected homes and other smart environments.
Official Cisco Packet Tracer Learning Resources
Cisco’s learning resources provide structured activities for beginners who want to practise networking concepts and develop their technical skills.
- Getting Started with Cisco Packet Tracer: Begin with the interface, basic device placement and simple network construction.
- Exploring Networking with Cisco Packet Tracer: Practise network design, device configuration and connectivity testing.
- Exploring Internet of Things with Cisco Packet Tracer: Learn about supported connected devices, sensors and simulated smart-home environments.
Start by visiting the official Cisco Packet Tracer page. You can also explore Cisco Networking Academy Lab Downloads for available activities and learning materials.
Course availability, enrolment requirements and page layouts may change. Check the official website for the latest access instructions.
Common Cisco Packet Tracer Problems and Solutions
Even a small network lab can produce errors when an IP address, cable or device setting is incorrect. Before rebuilding your network, use the following troubleshooting table to identify possible causes and solutions.
| Problem | What to Check or Do |
|---|---|
| Ping request times out | Verify both IP addresses, subnet masks, cable connections and device interfaces. Repeat the ping test if the first attempt fails. |
| Duplicate IP address | Assign each computer a unique IPv4 address within the subnet. |
| Link remains red | Check the selected ports, cable type and whether the interfaces are available and enabled. |
| Incorrect subnet mask | For this example, configure 255.255.255.0 on both computers. |
| Command Prompt is missing | Open the PC device window and select its Desktop tab. |
| Application sign-in fails | Check your internet connection, Cisco account and the authentication instructions for your software version. |
| Simulation shows too many events | Adjust the event filters to focus on ARP and ICMP traffic. |
| Saved project does not reopen correctly | Save the project in the appropriate Packet Tracer format and check that you are opening the correct file. |
A useful troubleshooting habit is to change one setting at a time and repeat the test. This makes it easier to identify which adjustment resolves the problem.
Best Practices for Learning Cisco Packet Tracer
To get the most out of your networking practice, focus on understanding why each configuration works instead of simply copying instructions.
- Save your work regularly: Use the File menu to save your network project so you can continue practising later.
- Label devices clearly: Names such as
PC-A,PC-B,Switch1andRouter1make larger topologies easier to understand. - Keep an IP addressing record: Maintain a table of IP addresses and subnet masks to avoid duplicate addresses and configuration errors.
- Test after each major change: Check device links and connectivity before adding more equipment.
- Use Simulation Mode to investigate failures: Inspect network events instead of relying only on the final ping result.
- Progress from simple to complex labs: Begin with directly connected computers, then introduce switches, routers, wireless devices and more advanced configurations.
- Practise with official Cisco activities: Use structured exercises to follow learning objectives and assess your progress.
These practices can help students preparing for networking coursework, practical assessments and entry-level networking certifications build a stronger understanding of computer networks.
Frequently Asked Questions About Cisco Packet Tracer
Here are detailed answers to common questions from beginners, students and aspiring network engineers in the Philippines who want to download, install and use Cisco Packet Tracer for networking practice and certification preparation.
Final Thoughts
Cisco Packet Tracer provides a practical starting point for anyone who wants to understand computer networking through hands-on experimentation. You can begin with two connected computers, learn how IPv4 addressing works, test connectivity and gradually progress to switches, routers, wireless networks and more advanced simulations.
For students and aspiring IT professionals in the Philippines, a useful next step is to explore Cisco’s official introductory learning resources and practise regularly. Keep your projects organised, investigate connection failures systematically and use the current CCST or CCNA exam objectives to guide your studies.