Smart App Download Philippines 2026: Login, Registration, Promos & Features
The Smart App Philippines 2026 provides Smart Communications subscribers with a convenient way to access and manage supported mobile services directly from their smartphones. Whether you are using Smart Prepaid, Smart Postpaid, or TNT, the application can help you explore available promos, check eligible account information, manage supported services, and access other features based on your mobile subscription.
If you are looking for a reliable Smart App download guide, this article explains how to download and install the official application, register your mobile number, log in securely, and explore its main features. You will also learn about available promo options, installation requirements, account verification, and solutions to common login problems. Follow the instructions below to get started with the Smart App in the Philippines.
What Is the Smart App?
The Smart App is an official mobile application developed by Smart Communications, Inc. for eligible customers in the Philippines. It is designed to make mobile account management more convenient by bringing supported Smart services together in one application. The app was previously known as GigaLife, so users familiar with the older application may recognise some of its functions.
Depending on your subscription type and the application’s current features, you may be able to check account information, explore available data packages, purchase eligible promos, monitor usage, and access supported billing or account management services. The features displayed may vary between Smart Prepaid, Smart Postpaid, and TNT accounts.
Instead of navigating multiple service channels, eligible subscribers can use the Smart App to access supported services from their mobile devices. However, some transactions or account-related requests may require additional verification or access through another official Smart service. Visit Homepage.
Official Smart App download links:
- Android: Download the Smart App from Google Play
- iPhone and iPad: Visit the Apple App Store and search for the official Smart application. Verify the developer information before downloading.
Always use an official app store or a download link provided by Smart Communications to protect your device and account information.
Smart App Download: Requirements Before Installation
Before beginning the Smart App download process, make sure your smartphone and mobile connection meet the application’s current requirements. Preparing these details can help prevent installation errors, verification delays, and login difficulties.
| Requirement | Details |
|---|---|
| Android smartphone | Check the minimum Android version and device compatibility on Google Play. |
| iPhone or iPad | Review the supported operating system requirements in the App Store listing. |
| Internet connection | Use a reliable Wi-Fi connection or mobile data to download and operate the application. |
| Smart or TNT mobile number | Prepare the number you want to register or manage, if supported. |
| SMS access | Keep your SIM available in case the app requires an OTP for verification. |
| Available storage | Ensure your device has enough free space for installation and updates. |
| Updated application | Install the latest version available through the official app store. |
The application’s file size, operating system requirements, and supported devices may change with future updates. Therefore, check the official store listing before installing the Smart App on your smartphone.
How to Download and Install the Smart App in the Philippines
Downloading the Smart App is straightforward when you use the official application listing. Follow the appropriate instructions for your device.
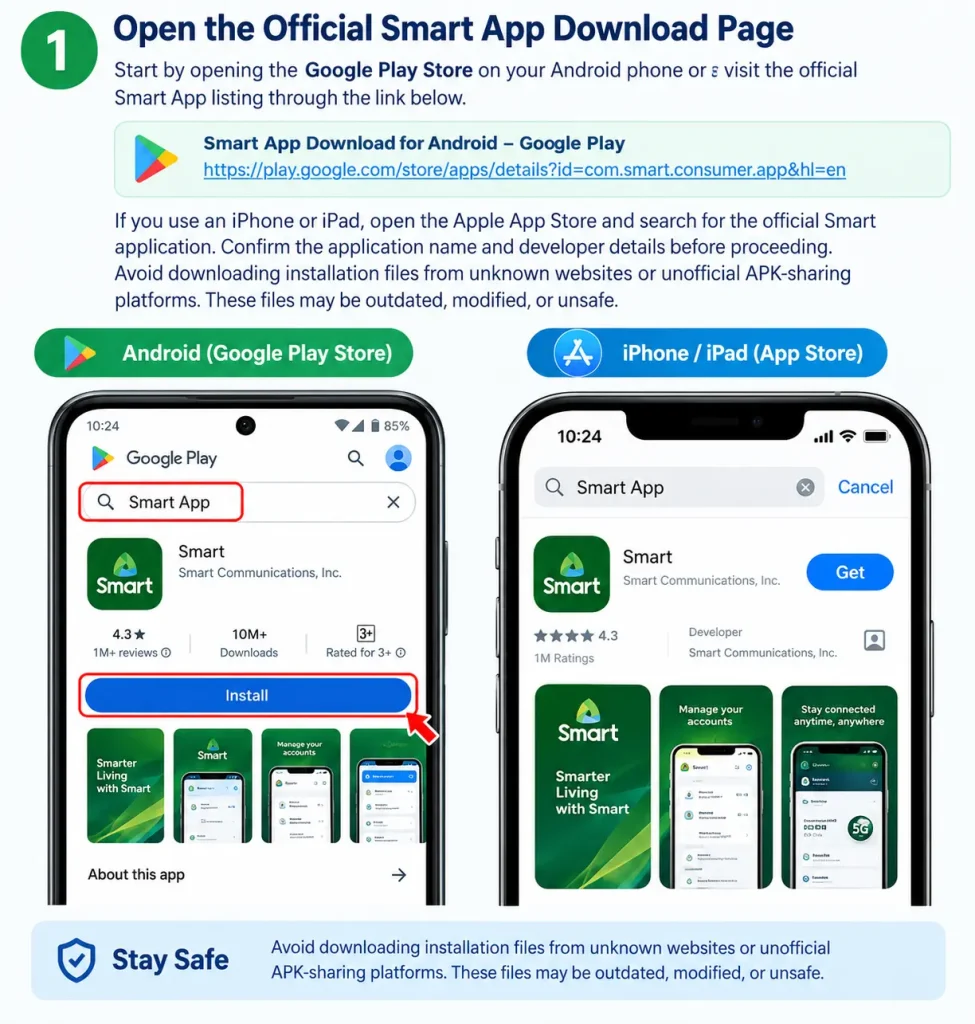
Step 1: Open the Official Smart App Download Page
Start by opening the Google Play Store on your Android phone or visiting the official Smart App listing through the link below.
Smart App Download for Android – Google Play
If you use an iPhone or iPad, open the Apple App Store and search for the official Smart application. Confirm the application name and developer details before proceeding. Avoid downloading installation files from unknown websites or unofficial APK-sharing platforms. These files may be outdated, modified, or unsafe.
Step 2: Verify the Application Details
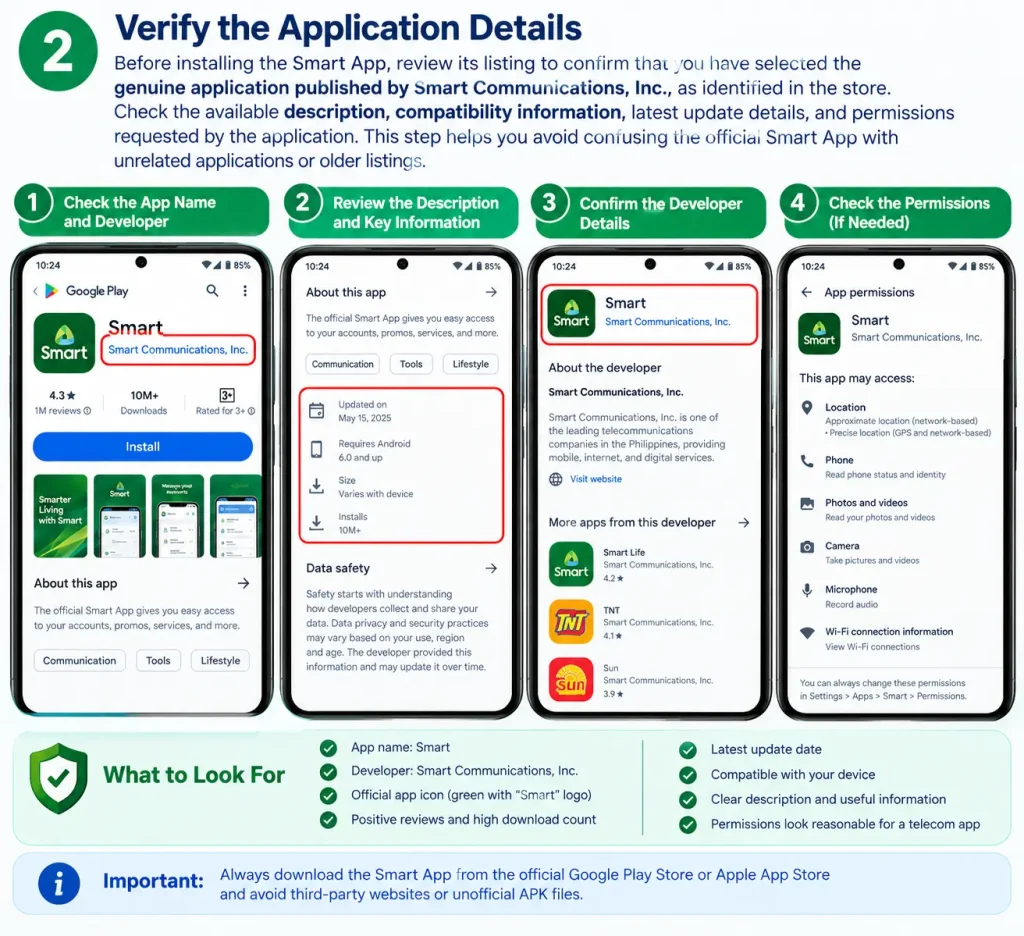
Before installing the Smart App, review its listing to confirm that you have selected the genuine application published by Smart Communications, Inc., as identified in the store.
Check the available description, compatibility information, latest update details, and permissions requested by the application. This step helps you avoid confusing the official Smart App with unrelated applications or older listings.
Step 3: Install the Smart App
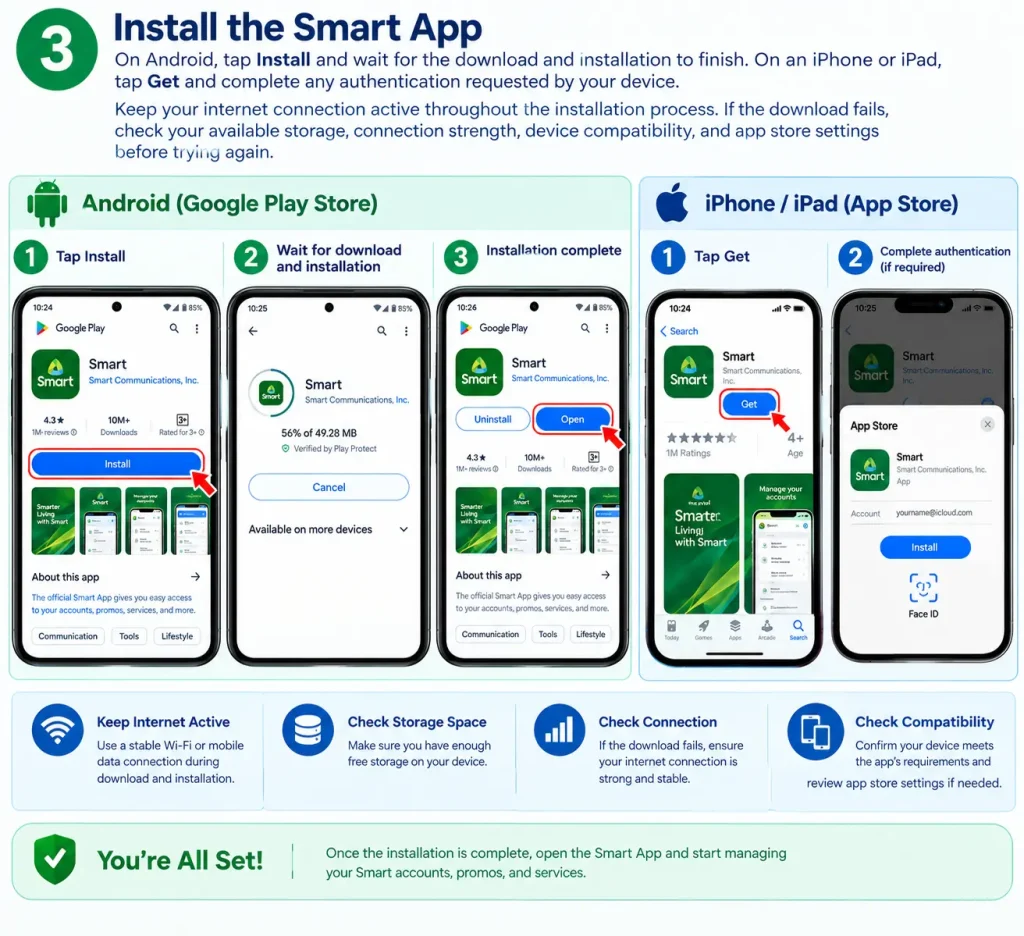
On Android, tap Install and wait for the download and installation to finish. On an iPhone or iPad, tap Get and complete any authentication requested by your device.
Keep your internet connection active throughout the installation process. If the download fails, check your available storage, connection strength, device compatibility, and app store settings before trying again.
Step 4: Open the Application
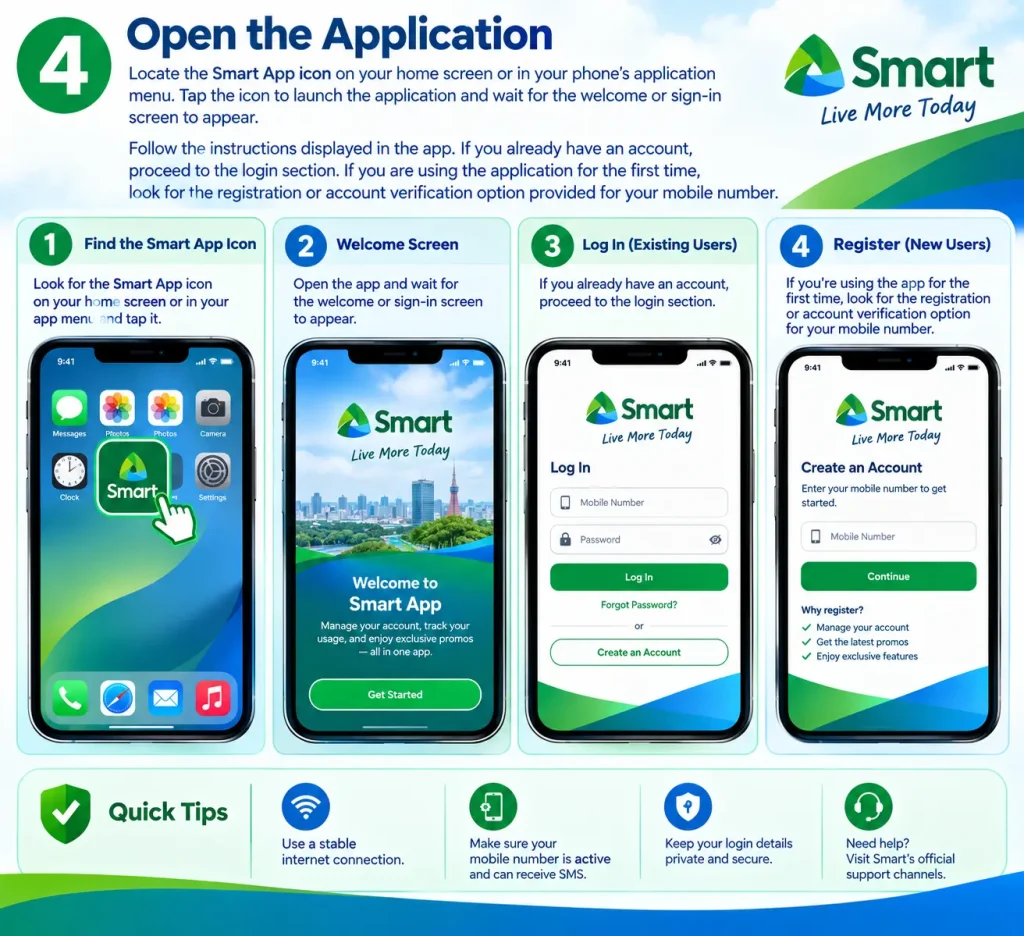
After installation, locate the Smart App icon on your home screen or in your phone’s application menu. Tap the icon to launch the application and wait for the welcome or sign-in screen to appear.
Follow the instructions displayed in the app. If you already have an account, proceed to the login section. If you are using the application for the first time, look for the registration or account verification option provided for your mobile number.
Smart App Login and Registration Guide
The Smart App login process allows eligible subscribers to access supported account services from their smartphones. Depending on the current application version, you may need to enter your mobile number, verify your identity, or complete additional on-screen steps.
Follow these general instructions to get started.
Step 1: Open the Smart App and Enter Your Mobile Number
Launch the Smart App and locate the login, sign-in, or registration option displayed on the screen. Enter the Smart or TNT mobile number you want to access, following the number format requested by the application.
Carefully check the digits before continuing. An incorrect mobile number can prevent you from receiving a verification code or accessing the intended account.
If the app displays different options for existing and new users, select the appropriate option for your situation.
Step 2: Request an OTP Verification Code
If the Smart App requests a one-time password (OTP), follow the instructions on the screen to receive the verification code through the supported method. SMS may be used where available.
Make sure your mobile number is active and can receive messages. If your SIM is installed in another device, check that device for the verification message.
For security, never share your OTP with another person. Enter the code only in the official Smart App or another verified Smart service that you intentionally accessed.
Step 3: Enter the Verification Code
Enter the OTP into the designated field and follow the next instructions. Check the code carefully before submitting it.
If the verification code has expired or is rejected, use the available resend option when permitted. Follow the waiting period displayed by the application rather than requesting multiple codes repeatedly.
If you do not receive an OTP, check your mobile signal, SMS reception, registered number, and any temporary network issues before trying again.
Step 4: Complete the Registration or Login Process
After successful verification, follow any remaining prompts to complete registration or sign in to your account. Depending on the application version and your account status, additional steps may be required.
Read any applicable terms and account notices before continuing. If the application asks you to confirm account information, make sure the details are correct.
The exact registration and login screens may differ according to your subscription, device, and application version. Always follow the instructions displayed in the official app.
Step 5: Check Your Account Dashboard
Once you have successfully signed in, review the account dashboard and confirm that the displayed mobile number or account information is correct.
Explore the available menus to identify supported services, eligible promos, usage information, and account management options. Some features may be available only to particular subscription types.
If the expected account details do not appear, check whether you signed in using the correct mobile number. If the problem continues, consult Smart’s official support channels for assistance.
Important: Smart may update its registration, verification, and login procedures. If the current app displays different instructions, follow the official on-screen process instead of relying exclusively on older guides.
Smart App Features: What Can You Do?
The Smart App Philippines brings several mobile account management services together in one convenient platform. Eligible Smart and TNT subscribers can use supported features to check account information, explore data promos, purchase load, monitor subscriptions, and manage selected services without visiting a physical service centre.
The available features depend on your mobile subscription, account eligibility, and the version of the application installed on your device. Before using a particular service, review the options displayed in your app and check the latest instructions on the official Smart website.
| Smart App Feature | How It Helps |
|---|---|
| Balance and Data Usage | Check supported account balances and review available data usage information. |
| Promo Registration | Browse available data packages and subscribe to eligible offers. |
| Load Purchases | Purchase load using the payment methods currently supported by your account. |
| Subscription Monitoring | Review eligible active promos, subscription inclusions, and usage details. |
| Multiple Account Management | Add or manage supported Smart, TNT, or broadband accounts where available. |
| GigaPoints Rewards | Check eligible rewards and explore available redemption options. |
| Postpaid Services | Access supported billing information and payment features. |
Not every feature is available to every subscriber. Smart may also update its application, payment services, and rewards programme over time. Always check the current app interface and official service information before completing a transaction.
How to Check Your Smart Load Balance and Remaining Data
Checking your remaining load balance and data allowance helps you understand your usage before purchasing another promo. The Smart App may display relevant balance, subscription, and usage information for supported accounts.
Follow these general steps to check your account details:
- Open the Smart App: Launch the application on your smartphone and sign in using your registered mobile number, if required.
- Select Your Account: Choose the Smart or TNT number you want to check if multiple accounts are linked.
- Review the Dashboard: Look for the balance, data usage, or active subscription information available on your account screen.
- Open Subscription Details: Select the relevant section to review your available data, promo inclusions, or validity information.
- Check Before Purchasing: Confirm your remaining allowance and the validity of your current promo before subscribing to another package.
Helpful tip: If your balance or data usage does not appear correctly, refresh the application and check your internet connection. You can also review recent Smart confirmation messages for information about activated promos and transactions.
The exact location of balance and usage details may change following an app update. If the information remains unavailable, consult the official Smart Help Centre.
How to Register for a Smart Data Promo
Smart Prepaid and TNT subscribers in the Philippines can use the Smart App to explore eligible data promos, compare subscription packages, and manage their mobile connectivity. Depending on your SIM type and account eligibility, available offers may include mobile data bundles, app-specific data, or packages with a fixed validity period.
Follow these steps to find and a suitable Smart data promo.
Step 1: Open the Smart App
Launch the Smart App on your smartphone and sign in if required. Make sure the correct Smart Prepaid or TNT mobile number is selected before browsing available data offers.
Step 2: Navigate to the Promos Section
Open the section displaying promos, data packages, or available offers. The menu name and layout may vary depending on your app version, SIM type, and account eligibility.
Step 3: Compare Available Data Promos
Review the available Smart data promos and compare their prices, data allowances, validity periods, and inclusions. Some packages provide open-access data, while others may offer data allocated for specific applications or activities. Always read the promo description to understand how the included data can be used.
Step 4: Select Your Preferred Data Package
Choose the Smart data promo that best matches your internet usage and budget. Before proceeding, check the required load balance, subscription conditions, applicable restrictions, and expiration period to avoid unexpected charges or unsuitable packages.
Step 5: Complete the Subscription
Tap the subscription or purchase option and follow the instructions displayed in the app. Depending on the selected promo, payment may be deducted from your available load balance or processed through another supported payment method. Review the transaction details before confirming your purchase.
Step 6: Verify Successful Promo Activation
Wait for the confirmation message or transaction result before using the newly purchased data package. If available, check the app’s subscription or data usage section to confirm the promo name, remaining data allowance, and expiration date.
How to Use GigaPay for Load and Promo Purchases
GigaPay is associated with payment services offered through the Smart App ecosystem. Eligible users may see supported payment options when purchasing load or selected services. The exact features depend on the current application, payment arrangements, and account eligibility.
To complete a supported transaction, follow these general steps:
- Open the Smart App and navigate to its load-purchase, payment, or relevant service section.
- Select the load amount, promo, or service you want to purchase.
- Review the available payment methods displayed on the screen.
- Select a supported payment option and provide any information requested by the official application.
- Carefully review the transaction amount, recipient number, and other relevant details.
- Authorise the payment using the required verification process.
- Wait for confirmation and check your account or transaction history to verify the result.
Payment methods may vary, so do not assume that a particular bank, e-wallet, or payment provider is supported unless it appears in the current application.
For security, never share your banking password, card PIN, or OTP with another person. If a payment remains pending, check its status before attempting another transaction to avoid duplicate charges.
How to Pay Your Smart Postpaid Bill Online
Smart Postpaid subscribers in the Philippines can check their billing information and explore available payment options through official Smart digital services. Paying your Smart Postpaid bill on time helps you manage your account, monitor outstanding charges, and avoid possible service interruptions due to overdue payments.
Before making a payment, prepare your Smart Postpaid account details and check your latest bill for the total amount due, billing period, and payment deadline. Follow these steps to review your bill and complete your payment securely.
Step 1: Access Your Smart Account
Visit the official My Smart Account Portal and sign in using the credentials associated with your Smart Postpaid account. If you are asked to verify your identity, follow the instructions displayed on the official website.
Step 2: Open Your Billing Information
After signing in, look for the billing, account overview, or payment section available to your account. The options displayed may vary depending on your subscription and the services currently supported by Smart.
Step 3: Review Your Outstanding Balance
Check your latest Smart Postpaid bill carefully. Confirm the total amount due, billing period, payment deadline, and any additional charges listed on your statement. Reviewing these details helps you avoid paying an incorrect amount.
Step 4: Choose an Available Payment Method
Select a payment option supported by the official Smart platform or your account. Follow the displayed instructions to proceed. Available payment channels and processing times may vary, so verify the current options before completing your transaction.
Step 5: Confirm Your Payment Details
Before submitting your payment, double-check the account information and amount. If you are redirected to a payment provider, ensure that you are using its legitimate website or application. Never share your password, one-time PIN (OTP), or other confidential authentication details with another person.
Step 6: Save Your Payment Confirmation
Once the transaction is completed, wait for the confirmation message or receipt. Save the transaction reference number, payment amount, date, and other relevant details. These records can help you resolve payment delays or billing discrepancies.
Important: If your payment has been deducted but your Smart Postpaid account still shows an outstanding balance, avoid making another payment immediately. Keep your receipt or transaction reference and contact Smart’s official website for assistance with payment verification.
How to Link Multiple Smart Accounts
The Smart App may support linking multiple eligible accounts, allowing users to manage supported mobile numbers or services from one application. This can be convenient for subscribers who use separate Smart and TNT numbers or have an eligible broadband connection.
To add another account:
- Open the Smart App and access the account management section.
- Look for an option to add, link, or manage another account.
- Enter the requested mobile number or account details.
- Complete any OTP verification or other security checks required by the application.
- Follow the remaining instructions until the app confirms the result.
- Review the account list to check whether the additional account appears.
The exact account-linking process may vary by service type and application version. If you cannot find the relevant option, check the Smart Help Centre for current instructions.
Only link accounts that you own or are authorised to manage. You should also ensure that you can access the registered number if verification is required.
GigaPoints: How to Check and Redeem Rewards
GigaPoints is a rewards feature associated with the Smart App ecosystem. Eligible subscribers may be able to check their points balance and explore available rewards, subject to the programme’s current rules and qualifying activities.
To review your rewards:
- Sign in to the Smart App.
- Look for the GigaPoints or rewards section, if available.
- Review your points balance and the redemption options displayed.
- Select a reward for which you meet the eligibility requirements.
- Read the applicable conditions, including any points requirement or validity period.
- Follow the instructions to complete the redemption, if you decide to proceed.
Reward availability and redemption conditions may change. Not every load purchase, bill payment, or subscription necessarily qualifies for points.
Before redeeming, review the current programme terms to understand qualifying activities, applicable restrictions, and any expiry conditions. If the rewards section is not available in your account, consult Smart’s official information for the latest guidance.
Smart App Troubleshooting: Common Problems and Solutions
Although the Smart App is designed to simplify mobile account management, users may occasionally experience login errors, delayed verification codes, loading issues, or unsuccessful transactions.
The following table explains common problems and practical steps you can try.
| Problem | Possible Cause | Recommended Solution |
|---|---|---|
| OTP not received | Weak mobile signal, incorrect number, or delayed SMS | Verify the number, check signal reception, and request another code when permitted. |
| Login unsuccessful | Incorrect information or temporary service issue | Recheck your details and retry after a short wait. |
| App keeps loading | Unstable internet or temporary technical problem | Switch between Wi-Fi and mobile data, then reopen the app. |
| Balance not displayed | Loading error or delayed account information | Refresh the screen and check your connection. |
| Promo purchase unsuccessful | Insufficient load, payment issue, or offer restriction | Review the error message and account balance before retrying. |
| Application crashes | Outdated app or temporary software issue | Update the application and restart your device. |
| Account linking fails | Incorrect details or incomplete verification | Check the account information and complete the requested security checks. |
| Payment status unclear | Delayed confirmation or processing issue | Check your transaction history and payment records before paying again. |
Additional Troubleshooting Tips
Update the Smart App: Visit the official app store and install any available update. An outdated version may cause compatibility or performance problems.
Check Your Internet Connection: Try opening another website or application to determine whether your connection is working correctly.
Restart Your Phone: Restarting the device may resolve temporary application or network issues.
Clear the App Cache on Android: Open your phone’s Settings, locate the Smart App under Apps, and select the available cache-clearing option. Menu names differ by device. Avoid clearing application data unless you understand that it may remove locally stored information or require you to sign in again.
Check for Service Issues: If login, verification, or transaction problems continue, consult the official Smart website or Help Centre for current support information.
Do not repeatedly submit a payment or promo purchase when the previous transaction’s status is uncertain. First verify whether the original request was completed.
Smart App vs. LiveSmart App: Which Should You Download
Before downloading an application, it is important to confirm that you are choosing the correct platform for your needs. Smart’s established Smart App, formerly known as GigaLife, and the newer LiveSmart platform should not automatically be treated as identical applications.
If you want to manage a supported Smart or TNT account, check the established application’s official listing first. If you are specifically looking for LiveSmart transaction services, review Smart’s official announcement and verify the current download details.
- Smart App: Official Google Play listing
- LiveSmart information: Smart’s official LiveSmart announcement
- Smart customer assistance: Smart Help Centre
Before installing either application, confirm the app name, publisher, supported services, and availability in your region. Only enter your mobile account or payment information after verifying that you are using the intended official application.
Frequently Asked Questions (FAQs) About the Smart App
Final Thoughts
The Smart App is a convenient option for Smart and TNT subscribers in the Philippines who want to manage their mobile services in one place. From checking remaining data and exploring available promos to accessing supported account and payment services, it can make everyday mobile management easier. Before downloading, verify that you have selected the official application and check which features are available for your account. Keep your login details and OTP private, review promo conditions before subscribing, and use Smart’s official support channels whenever you encounter a problem.